Sunday, July 9, 2023

Range Report 09JUL2023: Remington New Model Army and Colt 1851 Navy Practice

I don’t often write range reports on this blog for my routine practice days; usually, I only write about days when I’m comparing loads or trying a new or improved weapon or type of ammunition, etc.   Today, however, was such a good day I felt like writing about it.  People often say a bad day at the range is better than a good day doing most other things, but this was a good day at the range—in fact, my best ever with the Remington.

First, as always, the weapons:  I was shooting my Pietta Remington New Model Army (no, it’s not an 1858, for god’s sake, please stop calling them that!) and my Pietta Colt 1851 Navy (no, they didn’t call them that, either, but at least that year is accurate).  Both weapons have been heavily modified by Mr. Gary Barnes of Barnes Conversions, and I urge you to read earlier blog posts I wrote to learn what he did to them.  The short version is that both revolvers are almost as easy to load as a metallic cartridge revolver and both are far more accurate and reliable than the factory models.  I cannot recommend Mr. Barnes highly enough.

Remington NMA, Eley Bros. cap tin, and a packet of paper cartridges.

Colt Navy, Eley Bros. cap tin, and a packet of paper cartridges.

Next, the ammunition:  For the Remington I was using .44 Kerr bullets in nitrated paper shells with 25 grains of Schuetzen 3F powder and dipped in grease made of tallow and beeswax.  For the Colt I was using .36 Richmond Laboratories bullets in nitrated paper shells with 15 grains of Schuetzen 3F powder and dipped in grease made of tallow and beeswax (except see below about the Pyrodex cartridges).  All of the bullets were cast by me from pure lead using Eras Gone Bullet Molds.
To learn how I load combustible revolver cartridges (including links to videos I did for both .44 and .36 cartridges), see my blog post HERE.

.36 and .44 cartridge packages.

.44 Kerr cartridges made using an Eras Gone bullet mold.

.36 Richmond Lab cartridges made with an Eras Gone bullet mold.

My intent today was to practice for accuracy, that is, not to see how the revolvers shot, but to improve my own shooting with them.  Usually, I use a full sight and a 6:00 hold when shooting in order to determine how the weapon does with that specific load, but when you’re actually trying to shoot to hit you have to know where your weapon shoots and then aim off to try to bring your hits to your Intended Mean Point of Impact—the bullseye, or deer’s heart, or whatever.  Thus while I still used a full sight (it’s hard to do anything else given how poor revolver sights are), my Point of Aim was wherever I thought it needed to be to hit the bullseye.  I finally have it dead on with the Remington, but, as my regular readers will know, I just got the Colt back from Mr. Barnes so I’m still working on the correct Point of Aim.

I always use the String Test to gauge the accuracy of my shooting—in other words, how well I shoot with that particular piece, rather than how well the piece shoots if I take the human factor out of the equation by shooting from a rest.  The String Test is a fantastic method of gauging accuracy, and is far superior to the nearly meaningless group size figures people constantly spout off about.  I have written about this extensively, so I won’t go over it again except to say that all historical shooters should be using the String Test, and you can learn all you need to know about it on my blog post HERE.

All shooting was done standing offhand, and all Tables of Fire were shot at 15 yards.  Weather:  Bright and sunny, 70 degrees, wind ~11 mph from 3:00, 35% humidity, and the barometer was steady at 29.85 in. of Hg.

Up to this point, my average String Test numbers with the Remington have been between 2-3 in./rd. at 15 yards, a score I consider more than adequate, but my most recent scores have been in the 1.8-1.9 in./rd. range at 15 yards, an average I was thrilled to achieve.  Today, however, my first Table of Fire scored 1.8 in./rd., and then, when I settled in a bit, I shot three Tables of Fire in a row at 1.5 in./rd., a score I consider damned pleasing.  (Note that the black disks on the attached target pictures below are 3 inches in diameter.)  On Table 4 I had two fliers (I’m old, and my hands shake, so this is always going to be the case), but four of the six rounds were within 1” of the center, so without the fliers the score would have been about 0.75 in./rd.; they were basically the same hole right on the bullseye.  Now that’s shooting I feel like crowing about.

I am still working on aiming off with the Colt so I have more work to do with it.  The groups in the pictures below aren’t as tight as they could be, but that’s because I was adjusting my Point of Aim to try to get the sweet spot.  It’s really shooting very well, I just need to practice with it more to find the right sight picture.  And god’s blood, how I despise Colt sights.

Figure One: Tables 1 and 2

Table One:  Remington NMA
11.0 in. for 6 rds. = 1.8 in./rd.

Table Two:  Remington NMA
9.25 in. for 6 rounds = 1.5 in./rd.

Figure Two:  Tables 3 and 4
Figure Three: A closeup of Table Four.
Table Three:  Remington NMA
9.25 in. for 6 rounds = 1.5 in./rd.

Table Four:  Remington NMA
8.75 in. for 6 rounds = 1.5 in./rd.

Figure Four:  Tables 5 and 6
(NB:  I taped the holes before remembering to take the picture, so the tape marks are the bullet holes for this target.)

Table Five:  Colt Navy
20.5 in. for 6 rounds = 3.4 in./rd.

Table Six:  Colt Navy
19.5 in. for 6 rounds = 3.3 in./rd. (the picture looks like it says 10.5, but the pen skipped, its 19.5).


Not Pictured
I shot one more table of fire with the Colt using Pyrodex “P” and got a score of 19.25 inches for 6 rounds, or 3.2 in./rd.  What’s interesting about this is that the cartridge packet is several years old (I haven’t used Pyrodex since then), and yet it shot as well or better than the brand-new Schuetzen cartridges.  I found that very interesting.


Conclusion
I cannot say how pleased I am with the Remington results today.  Honestly, I think that’s pretty much within the limit of accuracy of the piece and ammunition, so there’s very little room for improvement except with regards to perhaps speed of shooting.  I’m pleased with the Colt, too, especially since before I sent it to be worked on it was a nightmare, a true lemon that was miserable to shoot and not at all accurate while now it’s a dream to shoot and reasonably accurate, and it will be much better when I’ve had time to practice with it.


Sunday, June 4, 2023

Range Report 04JUN2023: Zeroing the Smith Carbine


I took a friend of mine who is visiting from outside the USA to the range today to introduce him to the Snider since he just bought one himself, and didn’t get to do a lot of shooting myself, mostly plinking with a revolver.  What I did get to do, however, was to file down the new front sight on my Smith Carbine in order to zero it.
In the first of the three pictures below, you will see a bunch of shots which represent three-to-five-round groups.  They look like one big group, but they aren’t—the groups are gradually creeping up the paper as my friend was watching them through the target scope, and we were filing the front sight down after each group

Figure One:  First adjustments.


In the second picture, you will see more groups (only three rounds each this time) closing in, plus a few flyers from my friend who wanted to give it a go but who had never fired a Smith before—but, as you can see, the majority of rounds are now very close to the center in elevation (albeit off to the right).

Figure Two: Second adjustments.

In the third photograph, you will see my 10-round group after the final adjustment to the front sight post.  The group does not count the flyer way out to the right edge of the target as this was caused by me slipping my grip and thus does not represent what the weapon was actually doing, but there are still ten rounds in the group that were counted.  Here I was aiming off to allow for the windage error seen in the previous two pictures.  It’s hard to make it out, but the small cluster of hits just to the right and below the bull is actually four hits on the same spot, with three of them in the same hole.

As can be seen, this final group gave a String Test result of 2.1 in./rd.  That is a fantastic result.  For comparison, the black disk on the target is 3 inches in diameter.

Figure Three:  Aiming off to adjust fire.

All shooting was done from a seated supported position using a full sight.  The cartridges are Eras Gone Smith Bullets greased with the government recipe of tallow and beeswax sized to .515 inches loaded over 35 grains of Schuetzen 3F powder.

To see how I load ammunition for the Smith Carbine, go to:  https://historicalshooting.blogspot.com/2020/12/ammunition-for-smith-carbine.html

The String Test should be used by all shooters to judge and track the accuracy of their shooting as it is far more valuable than group size.  To learn more about the String test and how (and why) to use it, go to:  https://historicalshooting.blogspot.com/2020/12/the-string-test-measure-for-historical.html

Sunday, May 14, 2023

Range Report 05MAY2023: 1851 Colt Navy and .45 Colt Kirst Conversion

Pietta 1851 Colt Navy.
The first black-powder firearm I purchased was a Pietta 1851 Navy, and it was plagued with problems literally from day one.  My first day on the range was almost my last excursion into black powder because of the myriad problems with this piece.  Among several other issues, I sucked at capping (it was a very cold day and with my shaky hands getting numb it was a pain), and cap jams were a constant—more than one every single cylinder.  I don’t recall exactly, but I think I only fired a total of five rounds in that entire first session.

I persevered, however, purchasing Slix Shot nipples to significantly reduce cap jams, and just practicing more, and things did improve.  Then I got my Remington New Model Army, and realized how vastly superior Remingtons are to Colts, and the 1851 pretty much went into storage—I haven’t used it in a long time.

Still, I had a mold for the Eras Gone Richmond Lab .36 bullet, and if I made the cartridges just right and was extremely careful I could get a lot (not all) of them to load in the Navy, and the Slix Shots really did make a difference, so I still used it occasionally.  But I wanted to make it better, and it seemed important to have a .36-caliber pistol in my collection (and to shoot with it), so I sent it to Gary Barnes to have it reworked.  Mr. Barnes had already done magnificent work on my Remington and my Colt Conversion, so I thought he would make this piece worth shooting, and I was absolutely right.

Mr. Barnes opened out the loading port, modified the head of the rammer to match the points of my bullets, performed a trigger/action job, adjusted the angle of the forcing cone, and reamed the chambers to a uniform .380” (more on this below).  He also stripped off the nasty plastic finish on the grip and refinished it with oil.

Today was the first chance I’ve had to take this pistol to the range to see how it would work, and the difference is like night to day.  First and foremost, I didn’t have even a single cap jam, not one, in 39 rounds fired.  That’s stunning, especially for a damned Colt.  Second, the cartridges all loaded as easily as loading brass cartridges in a modern revolver, and almost as fast (except that they had to be rammed, of course).  I actually ran out of ammunition before I ran out of time because I didn’t expect them to load so quickly.

Another thing that made loading faster was that I purchased some 3-D-printed star cappers.  I have not been able to get any cappers to work despite trying three different kinds, but I find the Navy particularly difficult to cap (much harder than my Remington), so I wanted to try this one last thing.  The fourth time was the charm—the star cappers worked marvelously and reduced load time significantly.  In fact, I timed it, and it actually takes less time to load the star capper, then use it to cap the chambers, than it does just to cap the chambers by hand.  And since I loaded the cappers at home, that time wasn’t part of my shooting time, making the difference even more significant.  They aren’t historical, and I will not normally use them for historical shooting, but I rarely do any serious historical anything with the Navy and today was all about science, not history, so I was happy to have them.

Star Cappers.

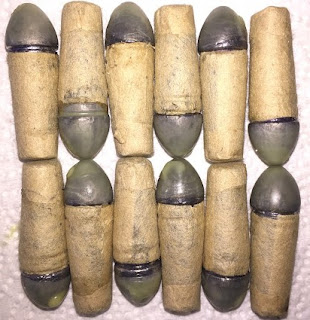
I used two different bullet designs for the Navy today, the .36 Richmond Lab bullets and the .36 Colt bullets, both cast with Eras Gone bullet molds.  The R.L. bullets are .390 in diameter, while the Colts are .380, and this made a significant difference today.  As noted above, Mr. Barnes reamed my cylinders to .380 (after consulting with me), and the Colts slid in too easily—almost as if you could load them with finger pressure (not really).  I had no chain fires (which can on very rare occasions happen at the mouth of the chamber if the ball is too small to properly seal the chamber), but I was concerned about it.  I fired three tables of fire with each type of cartridge, and the average string test for the heavier R.L. bullets for all tables of fire was 2.9 in./rd., while the average for the three tables of fire with the Colt cartridges was 4.7 in./rd.—a significantly worse result.  I do not believe the Colts are inherently less accurate, I just think that they need a tighter chamber for best accuracy.  Since the vast majority of .36 cartridges I make use the R.L. bullets this isn’t a problem, but it’s interesting and worth noting.  I actually prefer the R.L. cartridges anyway since they have better terminal ballistics and since their design makes making paper cartridges easier with them.
Richmond Lab combustible cartridges.

Colt cartridges.

All of these cartridges were made with nitrated shells and held 15 grains of Schuetzen 3F powder.  For more information about how I make combustible paper cartridges for cap and ball revolvers go to the link below.  It is primarily about .44 cartridges, but the method is not significantly different (although I find the smaller cartridges more of a pain to make), and it includes a link to a short video showing me making .36 Colt cartridges.
https://historicalshooting.blogspot.com/2020/10/making-civil-war-style-paper-cartridges.html

Anyone who is not yet using the String Test as a way to track shooting results needs to reexamine his life choices and start using this system since it is both historically authentic and far more meaningful and useful than just looking at group size.  To learn more about the String test and how (and why) to use it, go to:  https://historicalshooting.blogspot.com/2020/12/the-string-test-measure-for-historical.html

Pietta Colt 1860 Kirst Conversion in .45 Colt.

In addition to the Colt Navy I also took my 1860 Colt Conversion to the range today.  It shot quite well, but I ran into a very strange problem: some of the strikers are hitting the primers off center, and the cartridge doesn’t go off as a result.  Sometimes I was able to cycle the same cartridge around and to get it to go off (the primers afterward showed two strikes, one on the edge and one on the center), but I had several that just didn’t go off, which is why the number of rounds shown in the target pictures below isn’t consistent. I suspect I may have a problem with the timing of the cylinder.  Also, note that I forgot where I was in the order, so mistakenly labeled these target numbers 5 and 6, when they were actually the 7th and 8th tables of fire.

One thing about the results shown is that I was using a full sight picture with a 6:00 hold, and if only I had aimed off slightly (perhaps 2-3 inches below the bull) the results would have been even better (although I am very pleased with any score under 3 in./rd.).  This really is a very accurate revolver, and I think the load I’m using works well in it.  To learn more about how I load .45 Colt cartridges, see the link here:
https://historicalshooting.blogspot.com/2022/11/loading-ammunition-for-45-colt-1860.html

Location:  Lytle Creek.
Shooting Conditions:  67 deg., 48% humidity, bright and sunny, wind 2-5 m.p.h. from 7:00.
Range: 15 yards.
Shooting position:  Seated unsupported for the Navy, offhand for the Conversion.
Sight picture:  Full sight with a 6:00 hold.

Table One
1851 Navy with Richmond Labs cartridges.
String measurement: 19.0 in.
Number of Rounds: 6.
String Test:  3.2 in./rd.

Table Two
1851 Navy with Richmond Labs cartridges.
String measurement: 18.25 in.
Number of Rounds: 6.
String Test:  3.0 in./rd.

Tables of Fire 1 & 2.

Table Three
1851 Navy with Richmond Labs cartridges.
String measurement: 14.25 in.
Number of Rounds: 6.
String Test:  2.4 in./rd.

Table Four
1851 Navy with Colt cartridges.
String measurement: 26.5 in.
Number of Rounds: 6.
String Test:  4.4 in./rd.

Tables of Fire 3 & 4.

Table Five
1851 Navy with Colt cartridges.
String measurement: 26.25 in.
Number of Rounds: 6.
String Test:  4.4 in./rd.

Table Six
1851 Navy with Colt cartridges.
String measurement: 48.7 in.
Number of Rounds: 9.
String Test:  5.4 in./rd.

Tables of Fire 5 & 6.
Table Seven
1860 Colt Conversion in .45 Colt.
String measurement: 23.25 in.
Number of Rounds: 8.
String Test:  2.9 in./rd.

Table Eight
1860 Colt Conversion in .45 Colt.
String measurement: 26.5 in.
Number of Rounds: 9.
String Test:  2.9 in./rd.

Tables of Fire 7 & 8.


Tuesday, May 9, 2023

Historical Shooting with the Snider-Enfield Rifle

Cover.

I am very happy to announce that my new book, Historical Shooting with the Sider-Enfield Rifle, is now available for sale at Lulu.com.  This is the second book in my Historical Shooting series, and the one dearest to my heart as the Snider is my favorite black-powder firearm.

Historical shooting refers to shooting historical firearms with as much historical authenticity as possible using period-correct ammunition, equipment, and shooting techniques in order to understand their use.  This book is the result of my efforts to apply this approach to the historically important Snider-Enfield rifle. This book is not about the history of the British military in general nor of the Snider rifle in particular as there are books which cover those subjects in excellent detail. Rather, this book is about shooting as it was done then, although we will touch on some of the history for context. My intention is to show a modern historical shooter who owns one of these rifles how I make my ammunition, operate and maintain the piece, and shoot it as well as possible using the shooting techniques and practices of the late nineteenth century with period-correct equipment.

The book covers some general historical background, then provides detailed information about how I load and package ammunition for the Snider and the equipment I use for shooting it.  From there the book covers the theoretical principles of marksmanship as taught in period, how marksmanship was taught in the 19th century and how that can be replicated today, how to work up a load for best results using period-correct procedures, and period methods target of target practice and the way they can be adapted by a shooter today.

The perfect-bound, softcover book is lavishly illustrated with more than 160 photographs, illustrations, and diagrams, many in color.  It is approximately 150 pages in length in an 8.5x11 format.

A copy of the book can be purchased HERE.  It will eventually be available on Amazon, Barnes and Noble, and other online suppliers, too, but I would prefer people to buy it from Lulu if possible.

Here is the Table of Contents and some sample pages to give readers an idea what to expect.

Sunday, April 30, 2023

Range Report 04302023: Mk. IV Martini Henry and Mk. III Snider


My Martini Henry had some severe rot in the wood of the forestock, to the point where the screws would rip out every time I fired it.  I sent the rifle out to David Stavlo at Lodgewood Mfg. <https://www.lodgewood.com/> and he glass bedded it for me.  This is the second piece David has worked on for me, and I cannot recommend him highly enough.  There is no evidence of the screws ripping out, even though 20 of the cartridges I shot today were loaded with the full 85-grain government charge (see below).

I fired 30 rounds with it today, 10 for "plinking" and to get a sense of how it would hold together, and two scored tables of fire of 10 rounds each.  The first table of fire had a load consisting of 1:20 alloy paper patched bullets weighing 540 grains over cotton wadding, two card wads, a grease cookie, a third card wad, and 85 grains of Swiss 2F powder.  For a detailed explanation of how I load the cartridges, see the link HERE.

The second table of fire used cartridges with a bullet I cast in 1:20 alloy from an X-Ring Services mold.  They are .470 in. and weigh 475 grains, and are not paper patched.  I pan lube them in my normal tallow and beeswax grease.  They have the same cards and grease cookie, but only 70 grains of Schuetzen 2F powder.

I then fired two tables of fire with my Snider.  The first ToF went well, but midway through the second the extractor on my rifle became stuck such that I could no longer close the block nor extract the cartridge in the chamber, so I had to pack up and go home.  For a detailed explanation of how I load cartridges for my Snider, see the link HERE.

The targets I used for today's shooting are 2/3-scale reproductions of the Third-Class qualification targets used by the British for the Snider and in the early years of the MH.

About the String Test:
If you are not yet using the String Test as a way to track your shooting results, you should be since it is both historically correct and far more meaningful and useful than just looking at group size.  To learn more about the String test and how to use it, go to:  https://historicalshooting.blogspot.com/2020/12/the-string-test-measure-for-historical.html

Shooting Conditions:
65 deg., sunny, 42% humidity.  Wind extremely variable, blowing from 11:00 around to 3:00 and ranging from 4-5 mph to ~25 mph.
Range:  100 yards.  Firing position: Seated unsupported.

Table One: Martini Henry, 85 grains 2F, paper patched bullet.

Table One.

String Test:  75 in./10 rds. = 7.5 in./rd.
My point of aim was at the center of the bottom edge of the Outer using a full sight.

Table Two:  Martini Henry, 70 grains 2F, grease groove bullet.

Table Two.
String Test:  66 in./10 rds. = 6.6 in./rd.
Since the previous load shot high, and since this was a lighter load, I aimed at the center of the bottom edge of the bullseye with a full sight.  They still shot a bit high, so if I had used the same point of aim that I use on Table One I would have most of the rounds in the bull.  I have had very few chances to work with this rifle because of its problems, so I have a lot to work to do with regards to how to shoot it best.

Table Three:  Snider 65 grains of 1.5F Swiss with a 530-grain X-Ring Services .600 in. bullet.

Table Three.
String Test:  57 in./10 rds. = 5.7 in./rd.
(NB:  I wrote 9 rounds on the target, but the clump of hits just below the top of the bull on the left actually had three hits, and I missed that the first time.)
My point of aim was the center of the bottom edge of the outer with a fine sight.

Table Four:  Snider 65 grains of 1.5F Swiss with a 530-grain X-Ring Services .600 in. bullet.

Table Four.

String Test:  26 in./5 rds. = 5.2 in./rd.
(NB:  Another miscount--I thought I had fired 7 rounds, but actually only got off 5 before the extractor malfunction.)
My point of aim was the same as before, the center of the bottom edge of the outer with a fine sight.

Saturday, April 15, 2023

Range Report 15APR2023: The 1859 Sharps Infantry Rifle


I have long wanted a Sharps Infantry Rifle, but since they are so scarce all I could find was a second-hand Pedersoli reproduction.  Sharps are notorious (and rightly so) for poor ignition and severe fouling, so the previous owner had had it converted from the factory condition to be more reliable.  Unfortunately, when I got it I was unable to fire a single round from it—it simply would not set off the charge, which, naturally, was intensely frustrating.  At the advice of several people, especially Mike Beliveau of the Duelist 1954 YT channel, I sent the rifle to Larry Flees (<larryflees111@gmail.com>) to have him rebuild the rifle according to his conversion system.  Today was my first trial of the rifle since getting it back.

The cartridges I used are close copies of the flat-based linen cartridges used during the War, except instead of the 2-band bullets used by Federal suppliers I use the 504-grain Richmond Lab bullets I cast using an Eras Gone bullet mold.  The cartridges have a linen shell with a tissue paper base and contain 65 grains of Schuetzen 2F powder, just as was used in period.  The cartridges were packaged in historically accurate 10-round boxes which very closely match one style of the originals.  To learn how I load the cartridges, read the essay linked here:
https://historicalshooting.blogspot.com/2022/10/loading-ammunition-for-1859-sharps-rifle.html

Location:  Lytle Creek
Conditions: 58 degrees; dry; sunny; winds highly variable gusting up to 20 mph from 12:00 to 3:00.
Shooting Position:  Seated unsupported.
Sight Picture:  Full sight, 6:00 hold.
Range:  50 yards. 

I was only able to fire three tables of fire today, which was intensely frustrating, but the good news is that the Flees conversion does actually work, and the rifle did shoot.   Unfortunately, seven rounds into the third table of fire I discovered that I could not get the breech to fall, and so I was unable to continue firing.  After getting home I was able to use a hammer and a plastic rod to tap the block down for cleaning; more on this in the Conclusion below.

The first table of fire was five rounds made with paper tubes instead of linen.  My intention was to use the paper tubes for casual plinking since they are easier to make than the linen cartridges.  Unfortunately, their accuracy was appallingly bad, as will be seen on the first target below.  I believe that the paper does not combust (it is not nitrated) as the linen does and so clings to the bullet as it flies downrange, acting as a drag on the bullet.  I didn’t bother to determine a string test score for this first table of fire as there was obviously no point; needless to say, this experiment was a failure and won’t be repeated.  The bullet holes covered in blue tape on the first target represent Table One using the paper cartridges.

Historical shooters who are not yet using the String Test as a way to track their results should be since it is both historically correct and far more meaningful and useful than just looking at group size.  To learn more about the String Test and how to use it read the essay linked here:
https://historicalshooting.blogspot.com/2020/12/the-string-test-measure-for-historical.html

Table Two
Table Two
5 rounds, 17.25 inches.
String Test:  3.45 in./rd.

Table Three

Table Three
7 rounds, 22 inches.
String Test:  3.14 in./rd.

Conclusion
Overall I am pleased—a rifle that shoots is far better than one that does not.  Moreover, the string test results are pretty good for a first time out with this piece, although naturally I hope to do better with practice.

Of course, having the block lock up was intensely frustrating.  I initially blamed this on fouling on the breech since the Sharps is widely known to have this problem, but it seemed odd given that I had only fired 17 rounds, and as bad as the Sharps is, that’s pretty extreme.  When I got home I carefully tapped the breech block out and discovered a lump of linen had been jammed between the breech and the block, effectively locking the whole thing in place.  This was confusing at first since these cartridges are nearly exact copies of those used in period, but I recalled that as I fired more rounds the cartridges started to protrude slightly from the chamber, no doubt because of the fouling which built up there.  This led me to realize that the breech was cutting off a small piece of linen that protruded from the chamber and that this was getting caught in the action.

It is essential to measure the length of the cartridges correctly when making them to ensure they fit the chamber perfectly, which I had done, but I didn’t take fouling into account.  The difference isn’t large, perhaps 1/32 or 1/16 in., but it’s enough to catch on the edge of the block when it closes.  That means that I have to go back and trim the former I use to make the shells slightly to make the overall cartridges slightly shorter so that they remain fully inside the chamber even when it is fouled.

Every step is a learning process, and I learned a lot today.  Still, I am thrilled at being able to shoot this piece at all, and I think that with a little work on the cartridges and a lot more practice I can improve my results significantly.

Tuesday, March 21, 2023

The Historical Shooting Kit of a Civil War Cavalryman

Civil War cavalry arms.
Introduction
The equipment needed or desired by a historical shooter is largely a matter of personal taste and interest; the kit chosen can be as simple as just a weapon and ammunition or can be as elaborate as a full military uniform and equipment as for a living history presentation, or anywhere in between.  In this post I will review the gear I have assembled for my personal kit as an example of what the reader may wish to consider.  Obviously, this is a work in progress and will need a lot of work to bring to the standard I hope to achieve.

I don’t participate in Civil War reenactment, so the kit presented here is very generic, but with a few exceptions does a fairly decent job of presenting a realistic kit for a Federal cavalryman late in the War.  The main flaws in this kit are that I don’t have the correct trousers (see below), that my canteen is a modern sutlers-row example, and that my saber is garbage.

The Smith Carbine
The Smith carbine is a .50-caliber breech-loading rifled carbine patented by Gilbert Smith on June 23, 1857 that was used by various cavalry units during the Civil War.  They were manufactured by the Massachusetts Arms Company of Chicopee Falls, Massachusetts and the the American Machine Works in Springfield, Massachusetts. The name of the distributor for the weapon, Poultney & Trimble of Baltimore, Maryland, is often stamped on the carbines’ receivers.  They were 39½ inches in overall length with a 21⅝-inch barrel.  Approximately 30,000 Smith carbines were manufactured in total.  My Smith is a reproduction by Pietta that has been extensively reworked by David Stavlo at Lodgewood Manufacturing.

Pietta Smith Carbine.

An even more unusual aspect of the Smith was its ammunition.  The earliest Smith cartridges consisted of a .50-caliber bullet loaded into a hardened rubber case.  The case was pierced in the back to allow the flash from the detonating musket cap to reach the powder within, setting off the round.  The rubber case would obturate to fill the chamber completely, making the cartridge excellent at preventing the escape of combustion gasses which so plagued other breech-loading rifles of the period.  The rubber for these unusual cartridges became scarce later in the period, so a different approach was used:  Metal foil was wrapped around a mandrel to form the case, and paper was then wrapped around that.

Smith cartridges and cartridge packets.

Poultney & Trimble-style foil cartridges.  Note the different style of packaging.

To see how I load ammunition for my Smith, see here:
https://historicalshooting.blogspot.com/2020/12/ammunition-for-smith-carbine.html

The Remington New Model Army
The New Model Army was a .44-caliber closed-top revolver designed c. 1863 by Eliphalet Remington & Sons of Ilion, NY. They made three designs, a pocket model in .31 caliber, a Navy model in .36 caliber, and this one, with all being essentially the same design except for the caliber and some very minor differences in frame size and in hammer and cylinder design.  The New Model Army is often mistakenly called the “1858 Remington,” however, that appellation arose from collectors who misunderstood the 1858 patent date stamped on the barrel. 1858 was the date of the patent on some aspects of the loading lever system and does not apply to the revolver in general, so the name is quite incorrect and should no longer be used. In reality, the New Model Army was designed in c. 1861-1863.  My Remington is a reproduction by Pietta that has been extensively reworked by Gary Barnes of Gary Barnes Conversions.

Remington New Model Army, reproduction cap tin, and a cartridge pack.

Kerr combustible cartridges.

To see how I load and package ammunition for my Remington, see here:
https://historicalshooting.blogspot.com/2020/10/making-civil-war-style-paper-cartridges.htm

My full kit.

The Forage Cap
The most common style of forage cap or “Bummer” cap was the M1858, which was dark blue wool with a floppy peak that falls forward when you wear it. The Kepi cap, with its short, rigidly formed body was far less common with enlisted men as it was a private-purchase item and was not even mentioned in the Uniform Regulations of 1861. The brim of the forage cap should be worn either flat or folded slightly upward, not rolled down-ward as most people do with baseball-style caps today.

Uniform Jacket
Many troopers wore the Mounted Services Shell Jacket, a blue, waist-length jacket with twelve buttons down the front. Others, however, wore the four-button Fatigue Jacket or “sack coat,” especially as the War progressed. These were lighter and more comfortable to wear and were probably more common than shell jackets for most of the war.

Shirt
Shirts varied considerably; at the beginning of the War troopers were issued the 1851 gray wool flannel shirt, but later the issued shirts were of white cotton or muslin. In addition, many troopers wore civilian shirts of various fabrics and colors.

Trousers
The issued trousers were of sky-blue wool in the Mounted Pattern, which had an extra layer of material in the seat and on the insides of the legs. Regulations called for the trousers to be worn outside of the boots (for those who had them), however, pictorial evidence indicates many troopers tended to tuck them into their boots in the field. The trousers were held up with cotton suspenders (which occasionally had elastic in them although it was not common); note that the suspenders were attached to buttons on the trousers, not to clips. Unfortunately, I have not managed to acquire a good pair of trousers, as the photograph above shows.

Footwear
Cavalry troopers wore both the M1851 Jefferson Brogans, which were lace-up ankle boots, and artillery boots. Artillery boots were rarely issued to Federal troops, but when they were, they were usually made of black leather with a square toe and a twelve-inch top. The very tall knee-flap boots many people love today were private purchase items and were uncommon for enlisted men.

The full belt kit.

Saber Belt
These were of black leather with two straps for the saber and a shoulder strap, although photographs show that most troopers left off the shoulder strap. Enlisted men wore the M1851 belt plate which was brass with a separate silver wreath.

Cap Pouch
The M1850 was the most common pattern issued, although several styles were in use. These were of black leather with a woolen lining to help with cap retention. These were most often worn on the front of the belt just to the right of the buckle plate, although they can occasionally be seen on the left side of the buckle.

Pistol Cartridge Pouch
These were called pouches rather than boxes because they did not have interior containers. These are small but should hold two to three wrapped packages of pistol ammunition. They have a small leather flap inside which makes for a good place to put a combination tool (see below). Not all enlisted troopers wore them, but when they did they were usually worn just to the right of the cap pouch.

The Pistol Holster
These were of black leather with an unmarked flap. They had a small strip attached to the flap to secure it closed on a brass post. Holsters were worn butt forward on the rear of the right hip.


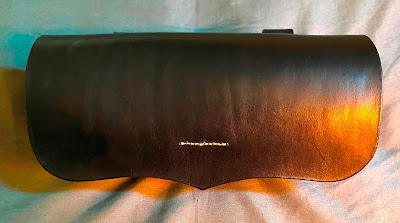
Smith cartridge box, outside view.

The interior of the box showing the cartridges and implement pouch.

The Carbine Cartridge Box
These were of black leather with two loops on the back for wearing on the belt, however, they also had buckles on the bottom and a strap on the back to enable them to be worn on a sling, as with the rifle cartridge boxes. They were almost never worn on a sling, but were usually worn on the belt on the right side of the back after the pistol holster. The 1860 pattern boxes had wooden blocks inside drilled to hold 20 rounds of carbine ammunition and had a small implement pouch.

All of the cartridge boxes sold by mainstream sutlers are designed for Sharp’s Carbines, so the Smith cartridges don’t fit in them. Originally, I used a Sharp’s box from which I had removed the wooden block so that the cartridges could be carried loose in the box, but that was unsatisfactory. I ordered a custom Smith cartridge box from David Jarnagin of C & D Jarnagin Company, which can be seen here.  Interestingly, although some original boxes had spaces for twenty cartridges this box has only eighteen. I discussed this with Mr. Jarnagin, who told me that the originals were never standardized and that mine was copied from an original in the collection of the Tennessee State Museum.

Carbine Sling
This is a wide leather strap with a wide brass buckle having two tongues and a brass strap end. It holds a steel keeper to which is attached a large steel spring-loaded hook used to hang the carbine. The hook attaches to the ring on the sliding bar on the carbine. It might seem as though these should be worn with the buckle on the front, however, most photographs of the period show them being worn with the buckle on the trooper’s back when in the field and in front only for formal events. The carbine sling should be worn so that the end of the leather falls to the point of your right hip. Although the carbine can hang loose by the side, when moving on foot they were usually flipped up over the right shoulder if attached, but note that when dismounting the trooper was taught to unsnap his carbine from its sling—they were not fired while attached to the sling when on foot.

Canteen
These were usually the M1858 smooth-sided or M1862 bullseye pattern. They were tin with a wool cover and a white cloth sling. They were issued with sky-blue wool covers at first, but later several different colors of wool were used. Modern reproductions are often made of stainless steel, and as long as the cover is used that is unnoticeable. Corks should be made of cork with a metal ring on top and secured with a piece of cord, not a chain. Some pictures from the period indicate these were carried on the saddle rather than being worn, however, in Congdon’s Cavalry Compendium we are told that the canteen was never to be attached to the saddle so here we see a case in which regulations may not always have been followed strictly.

Haversack
The Federal issue haversacks of the Civil War measured around 12 in. x 12 in. with a bottom gusset of 3-1/2 inches (although dimensions could vary) and were made of light cotton drilling or canvas which was often (but not always) “tarred” or painted with a combination of lamp black and linseed oil which gave them a shiny black water-resistant finish. During the war these were intended to carry food and eating implements only, however, the historical shooter will find them to be better for carrying all of his shooting implementia discreetly (I carry a field cleaning kit, oiler, range book, pen, stadiometer, etc., in mine). These were rarely carried on the trooper but were usually attached to the horse’s tack, so I am not wearing one here.

Cleaning Kits
The term “cleaning kit” is somewhat nebulous so we need to be specific about what we mean. We can break cleaning kits into three groupings: First, there’s a range or “shop kit,” by which I mean one with modern components not intended to recreate historical ones. Second, we can talk about a “garrison kit,” which means a period kit (or reproduction of one) intended to be stored in garrison. Third, and the focus here, is a “field kit,” meaning one which a trooper might take with him in the field.  A field kit should have, at a minimum, a wiper, a bore brush (you can’t really use a jag on a thong) for each caliber of weapon, cleaning patches, a combination tool having a nipple wrench and a turnscrew (or turnscrews) for each weapon, and an oil bottle or “oiler.”

All of the revolver combination tools I have seen have a nipple wrench with a single turnscrew set at right angles to it (except the Colt Walker which had a slightly different design).  This is a modern reproduction.

Reproduction revolver combination tool with a nipple wrench and turnscrew.

Carbine combination tools had a slightly different configuration, being a flat bar with a nipple wrench set into one end and then the end of the bar being a turnscrew, with an additional smaller turnscrew on a rotating pivot. Pictured below is a reproduction Smith combination tool made for me by Josh Davis of Davis Reproductions.  It is a superb and fully functional tool that I use in all day-to-day shooting.

Reproduction Smith combination tool.

Bore brushes of the period tended to be of twisted wire with boar’s bristles inserted into the winds of the wire. The one in the picture below is approximately five inches in overall length, with the brush proper being about four inches. The thong is around thirty inches in length and about 0.15 inch thick, and the ferrule is approximately three-quarters of an inch in length.  I can find no bore brushes made from boar bristles, however, nylon is a good replacement, so I have .54– and .45-caliber nylon bore brushes (I find that .50-caliber bore brushes don’t do a good job in the Smith). These are, unfortunately, shorter than the original, but I can live with the anachronism until I find some longer ones.

Reproduction bore wiper.

A review of various sources has not turned up any regulations for standard oilers. Instead, it seems a variety of civilian oilers have been recovered indicating that these may have been privately purchased or locally sourced. I have a reproduction of an oiler for the 1853-pattern Enfield rifle (many of which having been used in the War) that I fill with Ballistol.

I keep the brushes, cleaning patches, and oiler in a small drawstring bag which I keep in my haversack. The combination tools go in the accessory compartments of my cartridge box and pouch.

Historical Shooting with Civil War Cavalry Arms
For anyone interested in a far more detailed look at the kit and equipment of a Civil War Cavalryman along with extremely detailed information about the carbines and revolvers of the period and extensive information about loading and shooting them as practiced in period, I would suggest considering buying a copy of my book.

Historical Shooting with Civil War Cavalry Arms, by Hugh T. Knight, Jr.

The book is available for purchase here:
https://historicalshooting.blogspot.com/2022/08/historical-shooting-with-civil-war.html

Range Report 14JUN2026: Comparing the Smith and Burnside Carbines

I spent my Sunday at the Church of the Holy Black Powder.  Among other things, today saw a head-to-head comparison between my Burnside and S...