I have created a video showing the process described below for .44-caliber combustible cartridges. It can be found here: https://rumble.com/v2b5e7s-making-combustible-paper-cartridges-for-cap-and-ball-rervolvers.html
And I also made a video showing how I make .36-caliber combustible cartridges which can be found here:
https://rumble.com/v2mvmjq-making-.36-caliber-combustible-revolver-cartridges.html
INTRODUCTION
Cap and ball revolvers can be loaded in different ways, the simplest of which is to pour a charge of powder from a flask into a chamber, add a ball onto it, and then force the ball down onto the charge with the pistol’s loading lever. Many bullet molds of the period included both a conical and a round-ball cavity in each mold, so round balls were certainly used, but by the 1860’s almost all military ammunition used conical balls (Ordnance Dept. 1861 p. 266).
Loading with loose powder and ball is extremely fussy and time consuming and carrying all of the components separately is awkward. Because of this, most Civil War pistol ammunition was issued in the form of cartridges. The first of these were made in the same way paper cartridges were made for the muskets of the period, viz., a non-combustible paper package containing the powder charge and a pre-greased bullet. These were loaded just as with loose powder and ball: the paper was ripped open and the powder poured into the chamber, then the ball was seated on top and driven in with the loading lever. This method was used for the first military-issued cap and ball ammunition, such as for the Colt Dragoon revolvers (Suydam 1979 p. 30).
Later, combustible cartridges replaced the musket style because they were faster and easier to load. When loading combustible cartridges the entire cartridge was inserted into the chamber as a single unit and then driven into place with the loading lever, which meant that reloading was significantly faster and easier than loading with loose powder or with the earlier type (id. pp. 31-32). Several styles were tried, including foil-wrapped cartridges, compressed powder cartridges, and skin cartridges (with intestine forming the shell), but in this article we will focus exclusively on nitrated paper cartridges.
These paper cartridges consisted of a paper shell, corresponding to the brass case of a modern cartridge, which was prefilled with powder and glued to a conical bullet. The paper was treated with a solution of potassium nitrate to make it burn quickly and completely when fired. The bullet was then dipped in grease to finish the cartridge.
Many millions of combustible paper revolver cartridges were manufactured by both sides during the Civil War, varying considerably from manufacturer to manufacturer with regard to bullet sizes and powder loads (see Thomas 2003). Thus, we cannot say any specific bullet or load is uniquely “correct” for the period, so the intention of this essay is to show the making of typical combustible cartridges. These choices do not reflect the only kind of cartridges made but should be representative of the cartridges of the period in general.

Figure 1: Paper cartridges from Colt Cartridge
Works. Note the remains of the grease which can still be seen on the bullets.
THE BULLETS
Pistol bullets were made by a number of different manufacturers during the Civil War, including Colt, Johnston and Dow, Richmond Laboratory, and more. Unfortunately, most modern reproduction revolvers are designed to fire round balls rather than conical bullets despite the fact that the latter were the norm in the Civil War. Because of this, some reproduction pistols are not well suited to firing conical bullets, either because the loading port in the frame is not large enough or because the rammer on the loading lever extends too far into the loading port or both (see Fig. 2).
 |
| Figure 2: A picture showing how the rammer of the Pietta NMA extends too far into the loading port. |
Many of the bullets issued to Federal troops during the war will not fit into replica revolvers without extensive modifications to the weapon. Fortunately, Mark Hubbs of Eras Gone Bullet Molds (q.v.) discovered an authentic .44-caliber Civil War conical bullet design which will work in modern reproductions and created a mold for making them; this bullet was originally designed for the London Arms Company Kerr revolver (Hubbs 2020).
Thousands of Kerr revolvers were imported into the United States during the Civil War, the majority of which were smuggled into the Confederacy, and many Kerr paper cartridges and molds for bullets were imported as well so this was an extremely common bullet during the war.
 |
| Figure 3: An original Kerr bullet (left) and a modern reproduction from Eras Gone Bullet Molds. Photo courtesy of Mark Hubbs. |
The Kerr bullet was nominally .44 caliber. It was .457 inch at its largest diameter and weighed 225 grains (id.) making it relatively heavy for its type; compare this to the Johnston and Dow bullet which weighed 217 grains or to the Hazard Powder Co. Colt bullet at 211 grains (MacDonald 1972 p. 35). The Kerr bullets for this project were cast using a bullet mold made by Mark Hubbs of
Eras Gone Bullet Molds.
THE PAPER
Unfortunately, we do not know what specific kind of paper was used to make cartridges. Given the fact that rag paper was common during the period it is likely that was used, however, it almost certainly varied from manufacturer to manufacturer because the processes of the day were not standardized. We also know that a number of other materials, including foil, linen, and even dried animal gut were tried (Suydam 1979 pp. 31-33).
Many people use either cigarette papers or perm-wrap paper to make paper cartridges today because they are extremely thin and tend to burn completely without the need for any treatment. During the nineteenth century, however, when paper was used for cartridges it was nitrated to make it burn more quickly and completely. Nitrating paper means soaking it in a super-saturated solution of potassium nitrate (saltpeter) (id.). The potassium nitrate I used is simple stump remover purchased from Amazon; check the ingredients to ensure it's at least 90% potassium nitrate.
The paper I use is unbleached coffee filter paper which has been treated by soaking it in a concentrated solution of potassium nitrate and then drying it. Coffee filters are fairly thin, absorb the potassium nitrate solution well, and the unbleached paper is a close match in color when compared with extant examples. In addition, coffee filter paper is slightly heavier than cigarette paper, which is very important. Experiments with cartridges made from cigarette paper have shown them to be excessively delicate and liable to tear open very easily, which seems contraindicated for soldiers living and fighting in the field. The heavier coffee filter paper significantly reduces this problem, and while the thicker paper does require the nitration process to ensure complete combustion, doing so is quite simple and easy.
Nitrating the paper:
1. Heat two
cups of water to the point of boiling.
2. Add in
one-half of a cup of potassium nitrate and stir to dissolve.
3. Continue to
add more potassium nitrate, a little at a time, stirring constantly, until the
crystals will no longer dissolve.
4. Remove the
solution from the heat and allow it to cool.
5. Transfer the
solution to a shallow container which is wider than the coffee filters to be
used.
6. Spread the
coffee filters out flat, then dip them into the solution one at a time,
allowing them to become fully saturated; this only takes about thirty seconds.
7. Use
clothespins to hang the wet filters on a clothesline or a frame in the sun to
dry; this may take from thirty minutes to several hours depending upon the
weather. A dehydrator may also be used,
but no heat should be applied.
 |
| Figure 4: Soaking the filter papers in potassium nitrate solution; hanging the saturated papers to dry. |
Once dried, the papers can be stored for later use but be
aware that they are now highly flammable so they should be stored carefully in
a safe location away from any ignition sources.
The potassium nitrate solution can be saved and reused.
MANUFACTURING THE CARTRIDGES
Paper cartridges were made by rolling precut paper around a mandrel and securing it with glue. The glue specified in the 1861 U.S. Ordnance Manual was a starch-based glue (p. 264) which was used because it burned easily. I use Elmer’s natural glue sticks because the starch-based glue in them has similar burning characteristics and they are much easier to handle than liquid glue.
The cartridge former used for this study was manufactured by
a Hungarian company owned by Balázs Németh called
Capandball.com which
specializes in black powder accessories.
Their cartridge former is a two-part system which includes a mandrel for
wrapping the paper and a base with a hole drilled to fit the mandrel which is
used to shape the cartridge.
The kit
comes complete with the former, instructions, and templates for cutting the
paper.
 |
| Figure 5: Paper cartridge former by Capandball.com along with two formed paper shells. |
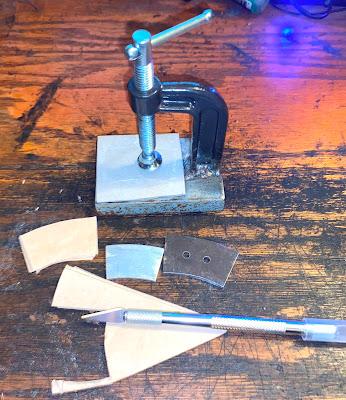
Forming the cartridges:
1. Fold the
filter paper so that several pieces can be cut at one time and use the template
to cut pieces from it for the bodies of the cartridges.
2. Use a nickel
as a template to cut disks from the filter paper to form the bases of the
cartridges.
3. Rub the
mandrel with paraffin and then rotate the mandrel in the base in order to
spread paraffin over the inside of the hole.
This will prevent the glue from causing the paper to adhere to the
former.
4. Wrap a cut
piece of the paper around the mandrel with the narrow end of the paper aligned
with the bottom of the mandrel, then glue the edge of the paper to close the
overlap.
5. Apply more
glue in a narrow band all around the bottom of the body of the cartridge while
it is still on the mandrel; the glue should only cover about one-eighth of an
inch of the paper.
6. Center one
of the cut disks of paper over the upper opening in the base of the former and
then insert the mandrel with the glued paper shell on it into the base of the
former and twist it to give it its final shape.
7. Remove the
mandrel from the paper, leaving the paper shell in the base.
8. Measure
twenty-five grains of black powder and pour it into the paper shell. Tap the
base lightly on a hard surface to settle the powder.
9. Apply a
small amount of glue to the rings at the base of a bullet, then insert the
bullet into the open end of the shell in the form. Press it down firmly to seat it and to
further compact the powder. Squeeze the
top edge of the shell to cause it to adhere to the bullet.
10. Remove the
finished cartridge from the former and again squeeze the top of the shell
against the base of the bullet with your fingers to ensure good adhesion. The finished cartridge will be ready to grease in a few minutes when the glue is fully dry.

 |
| Figure 6: The templates laid out on the folded paper; the pieces cut and ready to form. |
Figure 10: Starting to wrap the paper.
 |
| Figure 11: The finished wrap. |

Figure 12: Attaching the base.
 |
| Figure 13: The finished shell in the former. |
Figure 14: Filling the shell with powder.
 |
| Figure 15: The bullet glued into the shell. |
 |
| Figure 16: Some .44 Kerr and .36 Richmond Lab cartridges waiting to be greased. |
NOTES ABOUT CARTRIDGE MAKING
This takes practice. My first efforts were crude and practically
unusable, but I believe the ones pictured above to be quite acceptable. Since the coffee filter paper is heavier, it
makes the process easier than when using the thinner cigarette paper, which
often folds on itself or rips during handling. When wrapping the body of the shell on the mandrel it should be tight or else the paper will slide up on the mandrel and become too wide. Press the mandrel firmly into the base when forming the shell, and rotate it carefully to get a good shape, but do not use excessive force or the paper will tear. Rotating the mandrel when you insert it into the base will give the shell a crisper shape and make it easier to remove the mandrel because the paper often wants to remain on the mandrel when you try to remove it. Seat the bullet firmly in the cartridge when you assemble it because this will make the entire “package” firmer and more consistent. When removing the cartridge from the former, do so by pinching the paper shell right where it meets the base of the bullet because the glue will not be completely dry. If the bullet is not seated perfectly you can still work the edge of the paper shell up the side of the bullet slightly with a gentle sliding motion of your fingers when you first remove it before the glue is completely set.
GREASING THE BULLETSAfter the cartridges are formed the bullets should be dipped in grease in order to soften the fouling and reduce lead residue in the barrel when fired. Without grease, the bore will get progressively tighter after each shot until the rifling will no longer engage the bullets correctly which will severely reduce accuracy.
Although some manufacturers may have used different formulae for grease, the U.S. Ordnance Department specified the use of a mixture of eight parts beeswax to one-part lamb tallow (Ordnance Dept. 1861 p. 266), which is what I usually use. This ratio can be modified according to the season of the year; in very hot weather it is advantageous to have a larger proportion of beeswax so that the grease is less prone to melting. Buy the wax in pellet form because solid blocks are harder to get to melt properly, but if blocks must be used they can be grated first to aid in melting.
If tallow is not available, cheap grocery store olive oil can be mixed with beeswax in a 1:1 ratio and then heated and will work quite well, although it makes a somewhat softer coating. As with regular grease, vary the ratio according to outside temperature by using more beeswax when the weather is extremely warm.
Greasing Procedure:
1. Mix an 8:1
ratio of beeswax pellets to lamb tallow in a Pyrex glass bowl and heat this in
the microwave on high for thirty-second intervals until it is fully
melted. Stir to ensure it is mixed
thoroughly.
2. Hold each
cartridge upside down and dip the bullet into the hot mixture up
to the edge of the paper, allowing any excess to drip off.
3. Set the
greased bullets aside to cool; this only takes a minute or so.
Try to keep the grease from getting onto the paper because if it does it will increase the diameter of the cartridge at that point making it more difficult to load it into the chamber and may also contaminate the powder. Once the grease has cooled and hardened on the bullets the paper cartridges are complete and ready for use or packaging.
 |
| Figure 17: Completed cartridges cooling after being greased. |
Weighing six greased cartridges showed a range of from 242.96 to
247.74 grains, with an average of 245.79; median: 246.22; and standard
deviation: 2.29.
PACKAGING PAPER CARTRIDGES
During the Civil War manufacturers bundled paper cartridges into packs of six rounds each for distribution to the troops. During the early part of the War the packs were often nothing more than a sheet of paper wrapped and folded around loose cartridges and secured with a piece of cord, as shown in the picture below. These were primarily used for non-combustible paper cartridges (see Hubbs 2018 and Thomas 2003 pp. 22-23).
 |
| Figure 18: Paper-wrapped bundles of cartridges. |
After the change to the more delicate combustible cartridges, cartridges were usually placed into pasteboard boxes (e.g., see Thomas 2003 pp. 50-51) or else in light wooden blocks which had been drilled out to hold each round separately, with the blocks then wrapped with paper (e.g., id. p. 140). Often a string or wire would be glued to the block and left to hang outside of the wrapped paper to use for tearing the package open (Hubbs 2019). The wrappers were often painted with varnish in order to keep the cartridges dry (Thomas 2003 p. 20). Examples of this type of block can be seen in the pictures below.
 |
| Figure 19: Two wood-block paper cartridge bundles, one opened and the other still wrapped. The split-style box was unique to Colt ammunition, most blocks were not split. |
 |
| Figure 20: A drawing from the period by General John Pitman showing a cartridge block. |
These packages were shipped in wooden crates and then issued
to individual soldiers, who would carry them either in purpose-built leather
cartridge pouches, or, when belt space was at a premium, in their pockets,
knapsacks, haversacks, etc. Mark Hubbs
of Eras Gone Bullet Molds pointed out that a cavalry trooper had a
pistol holster, a carbine cartridge pouch, a carbine cap pouch, and a saber on
his belt, which, given the average waist sizes of the day, left little room for
an additional pistol cartridge pouch.
This would have been less of a problem for officers in other branches
since they wore less on their belts.
The cartridge pack kit used for this project was purchased
from The Tube Factory at Etsy.com, and came
with precut and drilled wooden blocks, preprinted wrappers, and pieces of hemp
string. These kits normally include
paper cartridge tubes for making blank cartridges for Civil War reenactment,
however, I elected not to get them since I was making my own.
Making wood-block cartridge packets:
1. Insert six
cartridges into the holes in the block, bullets up.
2. Wrap the
hemp string around the wooden block just below the top edge so that one end
sticks out to the side and glue it down with a glue stick. Allow the glue to dry.
3. Lay the
wrapper face down, then position the block on the wrapper so that the printed
text will be centered on the block when finished.
4. Fold the
bottom of the wrapper up over the block, then fold the top of the wrapper over
that so that the top overlaps the bottom.
Apply glue to the bottom edge of the wrapper and press the top edge onto
it, ensuring that the wrapper is tight.
Allow the glue to dry (try not to glue the paper to the block at any
point so that it will be easier to reuse the block).
5. Fold the
sides of the wrapper on the edges of the block as you would to wrap a Christmas
present and glue them in place, trimming
them as necessary to make a tight fit.
Make sure the loose end of the string sticks out from the wrapper by
about two inches.
6. If desired,
paint the entire cartridge packet with clear varnish to waterproof it (this was
not done for this project since weather was not an issue and not varnishing the
packages has no effect on shooting).
 |
| Figure 21: All of the components for a cartridge packet. |
 |
Figure 22: The cartridges inserted into the block.
|
 |
| Figure 23: Gluing the string. |
 |
| Figure 24: Gluing the body. |
Figure 25: Gluing the ends.
 Figure 26: The completed cartridge
bundle (note that the label does not match the bullets used here).
Figure 26: The completed cartridge
bundle (note that the label does not match the bullets used here).An additional note about cartridge packaging: Mark Hubbs was kind enough to share the
pictures below of an extant Kerr paper cartridge produced by Eley Company of
London. These pictures show an
additional outer wrapping of paper around the paper cartridge, presumably for
protection against water or physical damage.
While this outer wrapper was not attempted for this project, John Crossen of Crossen Cartridge Formers has worked out a method for replicating this wrapper, and I will be trying it soon.
 |
| Figure 27: Kerr paper cartridge mfd. by Eley Co. of London and the base showing the maker’s name. Photos courtesy of Mark Hubbs. |
 |
| Figure 28: Getting ready for the range--.44 and .36 cartridge packets. |
PERCUSSION CAPS
Percussion caps are small formed cups made of very thin
metal which are placed over the nipples of a revolver. They are filled with an explosive mixture
made from fulminate of mercury and potassium nitrate which will detonate when
struck sharply. The nipples are pierced
to allow the flame to pass from the cap through to the chamber to ignite the
cartridge.
Remington #10 caps were used for this study as they fit best
on the Pietta Remington NMA pistol used. A reproduction cap tin modeled after
period pieces was used to store the caps for this project; since Eley
manufactured Kerr bullets during the war, and since this example mentions both
Eley and Remington revolvers, it is particularly well suited to this project.
Figure 29: Original Eley Bros. cap tin beside my reproduction tin.
MUZZLE ENERGY
Using Kerr paper cartridges loaded with 25 grains of Schuetzen 3F powder I chronographed an average muzzle velocity of 850.7 f.p.s. from my Remington for a muzzle energy of 362 ft.-lbs. Compare this with a result of 856 f.p.s. recorded by Balázs Németh shooting an original Remington with 223-grain Johnston and Dow bullets over 24 grains of Swiss 3F (Németh 2020) for 363 ft.-lbs.
CAUTION!
This blog post describes the way in which I make paper cartridges for my revolvers. I am not telling anyone else how they should make them for their own weapons, only the way I do it myself for my purposes and for my equipment. Do not blame me if you try this process and have problems, take responsibility for yourself. Do your own research and make your own decisions about how you make your cartridges, and take personal responsibility for the results. Since I am not with you and am not making your cartridges, I cannot be held responsible for any adverse results when you make paper cartridges.
WORKS CITED
- Hubbs, Mark. “Civil War Revolver Cartridge Pouches.” YouTube, uploaded 20JAN2018, youtu.be/0hC1r_ad1Zc.
- ———. “Making Authentic Sharps Carbine Cartridges.” YouTube, uploaded 28APR2019, youtu.be/1ggj_uPEXiU.
- ———. “The Eras Gone Kerr 44 Bullet.” YouTube, uploaded 03042020, youtu.be/GDtYhG4vKqc.
- Macdonald, K. Dale. “M1860 was Colt Most Used by Civil War Combatants.” The American Rifleman, February 1972, pp. 33-35.
- Németh, Balázs. “Remington vs. Colt revolvers firing Johnston & Dow Bullets.” YouTube, uploaded 26JUL2017, youtu.be/5AThglFR5N4.
- United States Ordnance Department. The Ordnance Manual for the use of the Officers of the United States Army. Philadelphia: J. P. Lippincott, 1861.
- Suydam, C. R. “Pre-Metallic Cartridges for Pistols and Revolvers.” American Society of Arms Collectors Bulletin, Bulletin #40, Spring 1979, americansocietyofarmscollectors.org/wp-content/uploads/2019/06/1979-B40-Pre-Metallic-Cartridges-For-Pistols-And-.pdf. Accessed 19OCT2021, p. 30.
- Thomas, Dean S. Round Ball to Rimfire: A History of Civil War Small Arms Ammunition. Part Three, Federal Pistols, Revolvers & Miscellaneous Essays. Gettysburg: Thomas Publications, 2003.