Few terms relating to rifle marksmanship are as misunderstood today as the point blank, and yet understanding it is absolutely essential for understanding marksmanship with black-powder rifles of the nineteenth century. Most people today mistakenly use the term to mean a range which is so short that you can’t miss, or as one historical novelist liked to put it, “only a biscuit toss away.” As we shall see, there was confusion about the term even in period, but the biscuit toss definition has never applied to the term point blank in any source. In this essay we will examine what the term actually means, how it was used in period (both correctly and incorrectly), and why it is important to modern historical shooters.

Let’s begin with the correct definition: The point blank is the second point at which the trajectory of a bullet crosses the line of sight of a firearm for any given sight setting, as shown in the figure above. When shooting a rifle with a hausse (a rear sight which is adjustable for elevation) there will be a different point blank for each sight setting of the hausse. Thus, with the hausse folded down and set at its lowest setting, which is the 100 yard setting on most rifles, if you aim at a target, the bullet will hit the mark at which you aim at 100 yards; if you use that same setting and the target is slightly closer than 100 yards the bullet will hit slightly above the mark because it hasn’t dropped down to the point blank yet, and if the target is slightly beyond 100 yards the bullet will hit slightly below the mark. If you raise the sight setting to 200 yards, the bullet will hit the mark if the target is at 200 yards, and so on, for each sight setting.
NB: This assumes that the shooter is shooting ammunition with the correct load for the period and weapon in question; when loading ammunition today your hausse settings will probably not match the ballistics of your homemade ammunition, so you have to experiment to see how your ammunition performs.
Moreover, we know that this definition was used by both American and British sources of the period. In Heth’s 1862 A System of Target Practice for the use of Troops (p. 17) he wrote: “[P]oint-blank (V) is the second intersection of the trajectory (T K), or curve, with the line of sight.” And provided this illustration:
Likewise, Wilcox in his 1859
An Elementary Treatise Upon the Theory of Rifle Firing (p. 48): “Beyond the point L the trajectory rises above the line of sight for some distance, then it falls and cuts it again at V. This second point of intersection is called the point blank; the distance CV of the point blank from the muzzle, is called the range of the point blank…”
In Congdon’s 1864 Cavalry Compendium (p. 35), he says “When fired from a gun, the ball crosses above the line of sight; after going a certain distance—according to the arm used—it crosses below the line of sight: this point is called the point-blank."
In Cleveland’s 1864 Hints to Riflemen (p. 28) he says: “The point at which the trajectory intersects the line of sight, is called the “point blank,” and may be varied by elevating or depressing the after sight...”
British rifle sources used the same definition. While Busk doesn’t show an illustration, he describes exactly the same effect on pp. 55-56 of his 1860 Handbook for Hythe: “The object of the marksman is to make the point blank of his rifle as nearly as possible coincident with the object to be struck... In order to ensure striking an object within the point blank, we must aim under it, if the object to be struck is beyond the point blank, we must sight above it.”
In Thackery’s The Soldier’s Manual of Rifle Firing from 1854 (pp. 19-20), he says: “The
point where the trajectory the second time crosses the line of vision (figs. I., III.) is called the point-blank range, which should be the centre of the object to be struck.”
As this shows, the term point blank was used quite consistently by most sources from the period, however, there was some confusion about the term, too. In Walker’s 1864
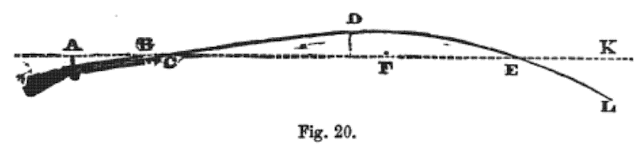
The Rifle, Its Theory and Practice (p. 86), he said that British artillerists had a different definition of point blank: “This is the correct explanation of point-blank, and the one adopted in the French service and abroad generally; but unfortunately English artillerists have another acceptation of the term, viz., that it means the “first graze” [i.e., the range at which a round will hit at the foot a target soldier for any given sight setting—HTK] of a bullet fired from the shoulder, the axis of the piece or firearm having been kept horizontal," a definition which might make sense for an artillerist who is concerned with artillery rounds which were often intended to hit the ground and bound across it to take to multiple targets. Notwithstanding the vagaries of artillerists, Walker holds the same definition for point blank, as applied to rifles, as seen in this essay, i.e., the second point at which the bullet crosses the line of sight, or point “E” in figure 20 below from p. 84 of his book. “After culminating it makes a gradual descent till it again cuts the line of sight at the point E. This point of intersection of the trajectory with the line of sight is of important interest. It constitutes what is termed “the point blank…” (p. 85).
Nor are we alone today in misunderstanding the term—people got it wrong in the nineteenth century, too. In Freemantle’s 1901 The Book of the Rifle (pp. 312-313), he spends considerable time trying to dissuade people from using the term point blank, but this is largely because people misunderstood it. He says that the ignorant call point blank the “distance which a bullet travels before it has dropped any appreciable amount.” Obviously, he says, this is wrong since the bullet follows a parabolic trajectory, but if you think about what they are saying with this inaccurate definition it amounts to what our sources said above: It is the range at which it appears not to drop any appreciable amount because it is the point at which the line of sight crosses the trajectory of the bullet for any given sight setting—in other words, the bullet seems to fly in a straight line to the point of aim, but only because the shooter can’t see the parabolic trajectory.
The reason the concept of the point blank is so important is because of the extreme parabolic curve of the bullet trajectories of black-powder rifles. With our modern rifles we (mistakenly) expect the kind of absolutely flat trajectories people thought they were getting in Freemantle’s complaint, but at longer ranges black-powder bullets can easily miss a target entirely unless the range is estimated correctly. For example, with the .577 Snider-Enfield rifle with the hausse set for 600 yards, the greatest height of the trajectory of the bullet will be 23 feet above the ground. At that sight setting, the bullet will hit an enemy infantryman who is 6 feet tall in the head (this is termed the “first catch”) if he is 585 yards away, in the waist (which is the point of aim) if he is at 600 yards (this is the point blank), and in the foot if he is at 615 yards (this is “first graze”) (1870 Musketry Instruction p. 35). Thus, when a shooter aims for his opponent’s waist using the 600-yard setting of his hausse he will hit an infantryman somewhere on his body, from the top of his head to his foot, only if that enemy is between 585 and 615 yards away; this is called the “margin” in most British musketry manuals, or the “dangerous space” in other sources. That means a shooter has to be able to estimate the range to his target to within 30 yards in order to make a hit at 600 yards. From this, the reason the point blank is so important should be obvious: Without understanding it, effective marksmanship at anything other than short ranges is impossible. This is a central principle of black-powder shooting, and one which every historical shooter must understand.