Sunday, September 4, 2022

Range Report 04SEP2022: .45 Colt Conversion and Remington New Model Army

Introduction
There was a lot going on today, although not as much as I'd hoped.  I shot 3 tables of fire with the .45 Colt Conversion revolver using the Kirst Konverter installed for me by Gary Barnes of Gary Barnes Cartridge Conversions for target score, plus one table of fire using the Snap Shooting process described below.  I also shot 4 tables of fire using Kerr paper cartridges from my Remington New Model Army that Gary Barnes modified for me to better accept paper cartridges.  I had intended to shoot several tables of fire with the Remington using Johnston and Dow paper cartridges, however, I found that they are so tall that despite Mr. Barnes' work my revolver still won't take them (which is not a criticism of Mr. Barnes--I sent him dummy Kerr paper cartridges for him to use to gauge his work, and those feed *perfectly*).

Colt Cartridge Conversion with replica cartridge packs.

Remington New Model Army with reproduction Eley Bros. cap tin and J&D cartridge packs.

Conditions
Location:  Lytle Creek.  Temperature: 78-86 degrees.  Clear and partly cloudy.  Wind:  ~4 m.p.h. from 8:00.  Humidity: 57%.  Range:  15 yards.  Shooting Position:  Seated unsupported for all except the snap shooting, which was done one-handed standing.  Note that the black circles I put on the targets are 3 inches in diameter.

Ammunition
.45 Colt:  35 grains of Schuetzen 3F powder and a 250-grain Lee RNFP bullet cast from pure lead and greased with lamb's tallow and beeswax.  Starline brass and CCI large pistol primers.  Packaged in replica Frankford Arsenal cartridge packages.  The average muzzle velocity was 788.1 fps, giving a muzzle energy of 345 ft.-lbs.  I need to get better at loading .45 Colt; all the cartridges passed the micrometer size test, but a few were too large at the base so they fit into the chamber but not far enough to allow the cylinder to rotate.

Kerr Cartridges:  .44-caliber Kerr bullets cast from pure lead with 25 grains of Schuetzen 3F powder in shells made from nitrated coffee filters.  For details of how I make paper cartridges, see the link HERE.


The String Test
The String Test is a method of gauging accuracy that was actually used during the Civil War and is vastly superior to simply measuring the group size since it takes both the group size and the distance from the mean center of the group to the bullseye into account in the same number, so it is a much more meaningful way to gauge your accuracy despite being incredibly easy to do.  All shooters, and certainly all historical shooters, should be using this test.  You can learn more about the String Test at the link HERE.

Snap Shooting
Given the fairly rudimentary sights on Civil War revolvers and their lack of adjustability we have to ask how important they were in actual combat, as opposed to target shooting. In Instructions in Rifle and Carbine Firing for the United States Army from 1889 Captain Stanhope Blunt said:
    "832. Owing to the unsteady support that the hand gives to the weapon the methods of aiming previously prescribed for the rifle and carbine cannot be advantageously followed; this is especially true of the practice mounted, where the motion of the horse and the very limited time available for the delivery of the fire permit neither the steadiness nor deliberation so requisite for success with the other arms.
    "833. The best results will then be obtained by following the method of snap shooting; for which the pistol should be held raised and then quickly projected at the mark and fired without pause or any effort to align it upon the object, the action being somewhat similar to that employed in throwing a missile from the hand and from the same raised position of the arm. (Blunt 1889 p. 309.)

He then gives the specifics of practicing this skill, recommending that troopers start by aiming at small black circles painted on their barracks walls (id. p. 310), and goes on to say:
    "838. The clasp of the thumb and second and third fingers should be firm, the first finger being on the trigger and the little finger underneath the end of the handle. If the clasp is too high up on the handle the muzzle will be elevated; if too low, the muzzle will be depressed. The clasp should not be so tight as to communicate tremor to the pistol, yet sufficiently firm to sustain, when firing with ball cartridges, the force of the recoil. After the discharge the position of raise pistol will be resumed.
    "839. These motions will at first be executed rather slowly, the instructor correcting the positions if necessary, and the motions quickened as the soldier acquires the habit of leveling or projecting instinctively the pistol in the same manner that the forefinger would be pointed at an object." (id. p. 311.)

When practicing snap shooting I never check the string test or consider group size.  I draw an 18 inch circle (the width of an average man) on the target and count the percentage of hits that fall within that circle--a true "minute of man" gauge.  All snap shooting is done standing with a one-handed grip.

Table One
Remington NMA with Kerr 25-grain combustible cartridges.
String Test:  10.25 in./6 rounds = 1.7 in./rd.

Table Two
Remington NMA with Kerr 25-grain combustible cartridges.
String Test:  11.0 in./6 rounds = 1.8 in./rd.

Tables One and Two.

Table Three
Colt Conversion with .45 Colt cartridges.
String Test:  17.25 in./6 rounds = 2.9 in./rd.

Table Four
Colt Conversion with .45 Colt cartridges.
String Test:  10.25 in./4 rounds = 2.6 in./rd.
Tables Three and Four.

Table Five
Remington NMA with Kerr 25-grain combustible cartridges.
String Test:  11.5 in./6 rounds = 1.9 in./rd.
Table Five.
Table Six
Colt Conversion with .45 Colt cartridges.
String Test:  20.0 in./10 rounds = 2.0 in./rd.

Table Seven
Remington NMA with Kerr 25-grain combustible cartridges.
String Test:  8.5 in./6 rounds = 1.4 in./rd.
Tables Six and Seven.

Table Eight:  Snap Shooting
Colt Conversion with .45 Colt cartridges.
Hit Rate:  9 hits/10 shots = 90%
Table Eight.

Conclusions
The Colt Conversion is, as is typical of Colts, shooting high.  I did not attempt to aim off since I wanted to get an idea of how the weapon was shooting.  Now that I know, I can aim off slightly below the target to bring my Mean Point of Impact closer to my Intended Mean Point of Impact (the Bullseye).  This will improve the string test results significantly.  However, note that the average for all tables of fire with the Colt was 2.4 in./rd.; considering that my averages with my Remington cap and ball (before it was worked on) were between 2-4 in./rd., it is clear this weapon will be extremely accurate when I finally get it dialed in.

Mr. Barnes did a lot of work on my Remington besides just modifying it to accept paper cartridges, including a trigger job, reaming the chambers, and adjusting the angle of the forcing cone.  He also changed the shape of the rammer so that it would not deform the conical bullets, which made for better accuracy.  As I wrote above, I had been averaging 2-4 in./rd. with my Remington before it was worked on with my best shooting ever being 1.8 in./rd. on a single table of fire, but today my total average for all tables of fire was 1.8 in./rd., matching my best results ever.  My best table of fire today was an amazing 1.4 in./rd., a new record for me.  The improvement in my accuracy is stunning.

As the picture of Table Eight will show, when snap shooting I anticipated on one shot and jerked the trigger before my weapon was on line--that's the high hit near the top edge of the target, and my only miss.  Note, however, that most of the hits were high:  I can't blame that on the bad Colt sights because I didn't use them at all, so clearly I am still pulling the trigger a little early.  I will need to work harder on this.  I will also have to reduce my circle size a bit as this kind of shooting is getting a bit easy; 18 inches is a good human body analog, but I think 14 might be a better test.  I also need to do it at a longer range--I had planned to shoot another table of fire using snap shooting at 25 yards but I ran out of time.

Overall, a great day of shooting, and I learned a lot.

Friday, August 26, 2022

Historical Shooting with Civil War Cavalry Arms--a new book by Hugh Knight

Historical Shooting with Civil War Cavalry Arms

I have just published a book about historical shooting with cavalry firearms of the Civil War.  This is not a book about the history of the War, nor of the weapons themselves (although I touch briefly on both subjects for context), but about shooting with carbines and cap-and-ball revolvers.  My intention is to show a modern shooter who owns one of these weapons how I make ammunition, operate and maintain them, and shoot them as well as possible using the shooting techniques and practices of the era with period-correct equipment. To that end, we begin with a brief history of some of the more popular cavalry firearms of the period; then go on to look at how to manufacture ammunition and how to package it correctly; how to clean and maintain the weapons; how to load and perform the shooting portion of the manuals of arms for them; how marksmanship was taught and practiced; how to work up a load for best target results; and the equipment appropriate for shooting.

The book is more than 170 pages in length in an 8.5x11-inch format, perfect-bound paperback.  It is available from Lulu.com for $30.00 (+shipping).

To purchase this book, use the link: HERE.

I hope that if you enjoy it you will leave a review and that if you have comments or corrections that you will email me.

Table of Contents
Introduction:  What is Historical Shooting?
Chapter One:  A Brief Overview of Cavalry Firearms
Chapter Two:  Ammunition
Chapter Three:  The Manuals of Arms and Loading
Chapter Four:  Cleaning and Maintenance
Chapter Five:  Marksmanship
Chapter Six:  Equipment

Sample Pages:


Sunday, July 31, 2022

Range Report 31JUL2022: Mk. III Snider Enfield Rifle

I shot 45 rounds (five of  which were for sighting in) today in four tables of fire using my Nepalese Mk. III Snider Enfield Rifle from 1867.

Conditions
Clear and dry.  Wind ~10 mph from S-SE (which caused my hits to be slightly left).  36% humidity.  Range:  100 yards.  Firing position:  Seated unsupported.  Sight Picture:  Fine Sight, 6:00 hold about 6 inches low.

Ammunition
All ammunition was made with the X-Ring Services .600 bullet in Magtech brass over 65 grains of Swiss 1.5F powder with corn meal filler and a card wad.  For detailed information about how the ammunition was loaded go here.

Muzzle Energy
I chronographed a representative sample of today's shots, getting an average muzzle velocity of 1,036.1 fps, for a muzzle energy of 1,253 ft-lbs.  Compare this to the stats for the government-issue Mk. VII ammunition with a 480 grain bullet over 70 grains of RFG powder with a muzzle velocity of 1,240 fps for a muzzle energy of 1,666 ft-lbs (see Skennerton, Ian. .577 Pattern Rifle Musket & Snider-Enfield. Self Published, 2005, p. 16).  I believe that increasing the charge in my cartridges to 70 grains would bring me very close to these historical numbers, but my rifle is somewhat frail and I am loathe to stress it.

Table One.

Table One
(Note that this table includes two of the five ranging shots I fired first.  Once I saw from the first three where I was hitting, I elected to shoot the other two for score.)
String Test:  48 in./12 rds. = 4.0 in./rd.

Table Two.
Table Two
String Test:  44 in./10 rds. = 4.4 in./rd.

Table Three.
Table Three
String Test:  40.5 in./10 rds. = 4.1 in./rd.

Table Four.

Table Four
String Test:  33.5 in./10 rds. = 3.35 in./rd.
Note:  This table was fired using a 1/3 scale version of the actual Snider 3rd-class target of the sort used for closer range scoring in period in order to simulate shooting at 200 yards instead of 100.  Using the 3-2-1 scoring system used for Snider qualification, I scored a 25/30 points.

The String Test
This is a method of gauging accuracy dating to the American Civil War.   I find it to be  vastly superior to simply measuring the group size since it takes both the group size and the distance from the mean center of the group to the bullseye into account in the same number, so it is a much more meaningful way to gauge your accuracy despite being incredibly easy to do.  All shooters, and certainly all historical shooters, should be using this test.  You can learn more about the String Test here.

Conclusions
This was my best-scoring day so far with my Snider, and I am extremely pleased.  Yes, my 25-year-old self armed with his 7.62 NATO Remington 700 rifle with Leupold scope shooting at 800 yards is laughing at my current self, but I honestly don't care much.  For this rifle, which has some problems, and given my shaky hands and the fact that I can barely see the target at that range, I am really happy, especially with Table Four.  I am also pleased to see that the Muzzle Energy is at least comparable to the original cartridges, especially since I strongly believe I could match them if I were willing to stress my piece a bit more.  I know I can do better, and hope to do so with more practice, but I think I have "dialed in" my rifle as best I can at this point.

Saturday, July 16, 2022

Range Report: 16 July 2022. 1860 Colt Army Conversion and Remington New Model Army

Conditions:  Wind moderate from 3:00.  87 degrees.  23% humidity.
Shooting Position:  Seated supported.
Sight Picture:  Full Sight with 6:00 hold.  I did not attempt to aim off, I always aimed the bottom of the black circle.
Range:  15 yards.
Revolver 1:  Pietta 1860 Colt Army with Kirst conversion cylinder firing hand-loaded .45 Colt cartridges.  The cartridges were made using Starline brass and were primed with CCI large pistol primers.  I cast the bullets from pure lead with a Lee mold, and they came out of the mold at .452 inch.  I am new to the fine art of loading revolver metallic cartridges, and I believe I can make them significantly better; in particular, I have not been crimping them enough and have been informed by those who know far more than I that doing so is important with black-powder cartridges and will result in tighter groups.
Revolver 2:  Pietta Remington New Model Army.  All rounds were made into combustible paper cartridges; for more information about how I make combustible cartridges go here.

I only fired three tables of fire with the Colt Conversion even though I went to the range fully intending to fire at least five tables of fire with this revolver.  Unfortunately, I seem to have acquired one of Pietta's rare lemons, and the revolver got worse and worse as I shot until I could no longer get it to function--not because of fouling, but because the revolver is simply mechanically flawed.  It will have to go back to the gunsmith for more work to see if it can be saved.  At the same time, I am quite pleased with the results I did get, with an average score between the three tables of fire of 2.9 in./rd.  This is not a fantastic result, but the groups were fairly good and I used the same sight picture every time.  Now that I know where the groups print I can aim off to bring the Mean Point of Impact closer to the Intended Mean Point of Impact (the bullseye), which will reduce the String Test measurement considerably.

Colt 1860 Army Conversion Revolver
Remington New Model Army

Replica Frankford Arsenal .45 Colt cartridge pack.
Replica .44 combustible cartridge cartridge pack.  Note that the label is incorrect and these were Kerr bullets, not Johnston and Dow.  I need a better label but have not yet found what the Kerr package labels looked like.

For those interested in learning more about the String Test, it is a method actually used during the Civil War and is vastly superior to simply measuring the group size since it takes both the group size and the distance from the mean center of the group to the bullseye into account in the same number, so it is a much more meaningful way to gauge your accuracy despite being incredibly easy to do.  All shooters, and certainly all historical shooters, should be using this test.  You can learn more about the String Test here.

Table 1:  Colt Conversion
Load:  .45 Colt 250 gr. Lee bullet with 35 gr. Schuetzen 3F
String Test:  12.5”/5 rds. = 2.5 in./rd.
Muzzle Energy:  Average velocity of 798.8 f.p.s. = 354 ft. lbs.

Table 2:  Colt Conversion
Load:  .45 Colt 250 gr. Lee bullet with 35 gr. Schuetzen 3F
String Test:  16.25”/5 rds. = 3.25 in.rd.
Muzzle Energy:  Average velocity of 769.5 f.p.s. = 329 ft.-lbs.

Table 3:  Colt Conversion
Load:  .45 Colt 250 gr. Lee bullet with 35 gr. Schuetzen 3F
String Test:  14.25”/5 rds. = 2.85 in./rd.

Table 4:  Remington NMA
Load:  20 grs. Swiss 3F with 225 gr. Kerr bullet
String Test:  15.0”/5 rds. (1 misfire) = 3.0 in./rd.

Table 5:  Remington NMA
Load:  25 gr Schuetzen 3F with 225 gr. Kerr bullet
String Test:  17”/6 rds.=2.83 in/rd.

Table 6:  Remington NMA
Load:  25 gr Schuetzen 3F 225 gr. Kerr bullet
String Test:  17.25”/6 rds. = 2.875 in./rd.
Muzzle Energy:  Average velocity of 850.7 f.p.s. = 362 ft.-lbs.
This table of fire was extremely interesting.  If you look at the picture below showing a closeup of the group, there was one round in the black and four rounds literally through the same hole, then there was one flyer.  I remember experiencing a muscle tremor as I fired, so I clearly pulled the shot.  Thus, although the String Test is fairly good, without that flyer the results would have been a result of 2.6 in./rd., a much better result.

Table 6 closeup.

Table 7:  Remington NMA
Load:  20 gr. Pyrodex (Old!) with 225 gr. Kerr bullet
String Test:  22.5”/rd. = 3.67 in./rd.
NB:  These cartridges were quite old, more than two years old (before I started noting the date on my cartridge packs).  I have not used Pyrodex in quite some time and this cartridge pack was stuck in the back of the box where I store my ammunition, so I wanted to shoot them off.  These results are quite poor, and I strongly suspect the age of the cartridges may have been part of the cause.  This is quite interesting because we often see discussions about how long ammunition lasts.  Note that in the past I have achieved much better String Test results with Pyrodex, so it is not that Pyrodex is inherently less accurate.  Note, too, that the rounds discharged flawlessly, with no hang time or any other ignition problems despite being more than two years old.

Tables 1 and 4.
Tables 2 and 3.
Table 5.
Tables 6 and 7.

Friday, April 29, 2022

Ballistics of the Smith Carbine


This trajectory graph was created in Excel using information derived from this web page: <shooterscalculator.com/ballistic-trajectory-chart.php> along with information I gathered (e.g., bullet weight, diameter, and muzzle velocity) as listed in the following chart:


This trajectory is meant to echo those shown in British musketry manuals (see below) of the period to show the “danger zone” of a particular weapon.  The danger zone is the area from “first catch” to “first graze” at any particular sight setting.  First catch is the range at which a bullet fired at that given sight setting will hit a standing man at the top of his head, and first graze is the range at which that same bullet would hit a man on his foot.  Thus, the danger zone is the range over which a given bullet would hit an enemy somewhere from the top of his head to his foot when you aim at center mass.  At normal rifle ranges, the trajectory will pass over an average soldier’s head for quite some distance, so knowing the danger zone is quite important.  With black-powder rifles danger zones start very wide, but at very long ranges the zone shrinks dramatically because of the parabolic nature of the bullet trajectories.


Note that the trajectory chart starts at 56 inches off the ground because that is the height of an average man’s shoulder.

Working from the assumption that the maximum effective range of the Smith Carbine is 150 yards, we can see from the above that the danger zone is the entire distance at which the weapon can be fired since first graze is at approximately 195 yards.  Thus, using this load and this bullet, if you aim at center mass you will it an enemy somewhere on his body at any normal shooting range for the weapon.

Note, however, that this information is based upon the load I use (i.e., 35 grains of 3F Schuetzen black powder with a 360-grain Eras Gone bullet) fired from my reproduction Pietta carbine.  For detailed information about how I load cartridges for my Smith carbine, go here.  Given that the original Smith load was closer to 50 grains and that nineteenth-century power was, in general, of much higher quality than we get today, and given that I cannot compare the rifling of the Pietta with an original, it is almost certain that these results do not match what an original would have.  Regardless, this information is useful for me as a way of estimating how to aim off for distance with my carbine.  For example, looking at the graph I can see that the highest point of the trajectory is 59.27 inches from 40 to 50 yards, whereas it is 54.04 inches at 100 yards, so I can see that I must aim about six inches lower when shooting at that distance than I would if I were shooting at 100 yards, and that matches well to my empirical experience.


Monday, March 28, 2022

The Shooting Kit of a Snider Rifleman

INTRODUCTION
The equipment needed or desired by a historical shooter is largely a matter of personal taste and interest; the kit chosen can be as simple as just a weapon and ammunition or can be as elaborate as a full military uniform and equipment as for a living history presentation, or anywhere in between.  In this post I will review the gear I have assembled for my personal kit as an example of what the reader may wish to consider.  Obviously, this is a work in progress and will need a lot of work to bring to the standard I hope to achieve.

While I do not intend to participate in a nineteenth-century living history group, I elected to pick a specific campaign in which the Snider played an important role as a way to focus my choices in a consistent way. I chose the Abyssinian campaign of 1866-1868, and specifically the Battle of Magdala, because that was the first time the Snider played an important role in the warfare of the period. For even more precision, I chose the 4th King’s Own Royal Regiment as my unit since they were one of the first in contact. For others of a like mind I heartily recommend reading Stanley’s Magdala:  The Story of the Abyssinian Campaign of 1866-7. For an excellent exemplar of a soldier from that campaign, look at the picture of a private of the 4th Foot shown below which was taken during the Abyssinian campaign.  As the photographs of the period make plain, by this point in history soldiers rarely wore knapsacks in battle, they being carried in the unit pack train instead. For that reason I chose to forego the knapsack and assemble the rest of the kit appropriate for a soldier in that battle; we might term this kit “Field Order.”

A Private of the 4th Foot in Abyssinia.

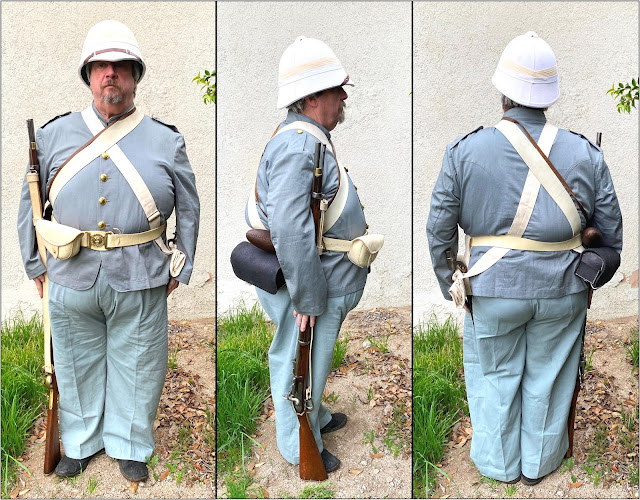
My full Abyssinian Campaign uniform.
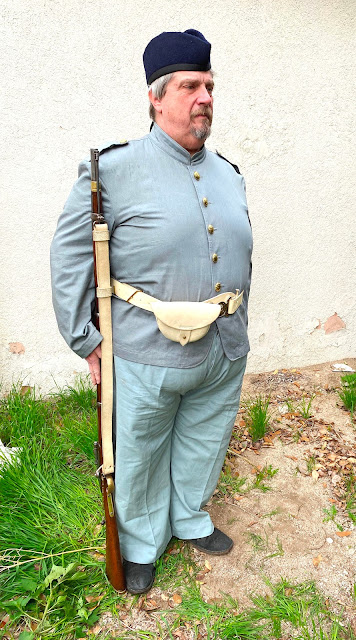
Drill Order uniform.

E
QUIPMENT DESCRIPTION
The air-tube helmet shown in the picture of a soldier of the 4th Foot came about because British designers were seeking a way to make a helmet suited to the heat of their foreign conquests. Harry Elwood of Elwood and Sons came up with a so-called ‘air chamber principle’ for hats. I have recently acquired a reproduction air-tube helmet made by a friend, but the example in the older pictures above is a modern reproduction of a later foreign-service helmet.
The Elwood air-tube helmet.

My reproduction air-tube helmet.

Information about the uniform worn in the Abyssinian campaign is somewhat limited, however, this was the first instance of khaki (or “kharki”)—a gray, tan, or brown fabric made of closely twilled linen or cotton—being officially issued to British troops (Farwell 1989 p. 75). This was the standard white drill uniform of 1859 dyed khaki in color (Barthorp 1988 p. 45); the jacket has a standing collar and five buttons, and the trousers are supported by braces. The uniform had a loose, comfortable fit well suited to hot weather.  Although people today usually think of khaki being a brownish color, the color of such uniforms varied widely, and it is likely those worn by the 4th Foot were a sort of bluish gray (Barthorp 1994 p. 20).  Unfortunately, no one carries the blue-gray khaki of the period, so I ordered a replica uniform from Regimental Quartermasters (regimental-quartermaster.com/index.html).  The shirt pictured below comes from The Replicators in India.

Standard British military shirt.
The load-bearing equipment of this period as worn in combat consisted of the 1862-pattern waist belt, 1861-pattern ball bag, 1854-pattern bayonet frog, and the 1859-pattern cartridge pouch as modified for the Snider and suspended from a buff sling. As noted above, and as the pictures of the Abyssinian campaign make plain, the knapsack was not worn in combat at this time, so I do not use one. The pattern 1862 waist belt had a thong for attaching the locket (buckle) rather than having it sewn on as in previous models (Turner 2006 p.49) and was worn over the sling of the cartridge pouch to keep it from moving in use. My waist belt and ball bag were made by Graham Humphrey. The locket or buckle for this pattern of waist belt should be of the regimental design, however mine is a later “Dieu et Mon Droit” Edwardian example, an anachronism I am willing to accept; it comes from Regimental Quartermasters.

The ball bag was used to carry a rag, the oil bottle, and ten rounds of loose ammunition (id. p. 49). The cartridge pouch was modified from the previous model by removing the cap pouch and by modifying it to hold 50 rounds of wrapped Snider ammunition in two tin dividers along with a compartment for the Snider combination tool (id. p. 63). My load bearing equipment comes from Graham Humphrey.
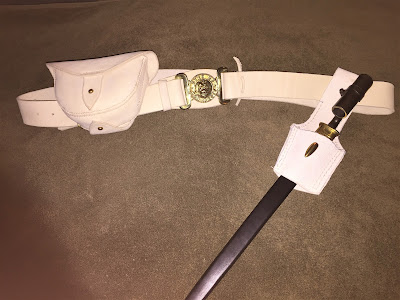
My waist belt, ball bag, and bayonet.

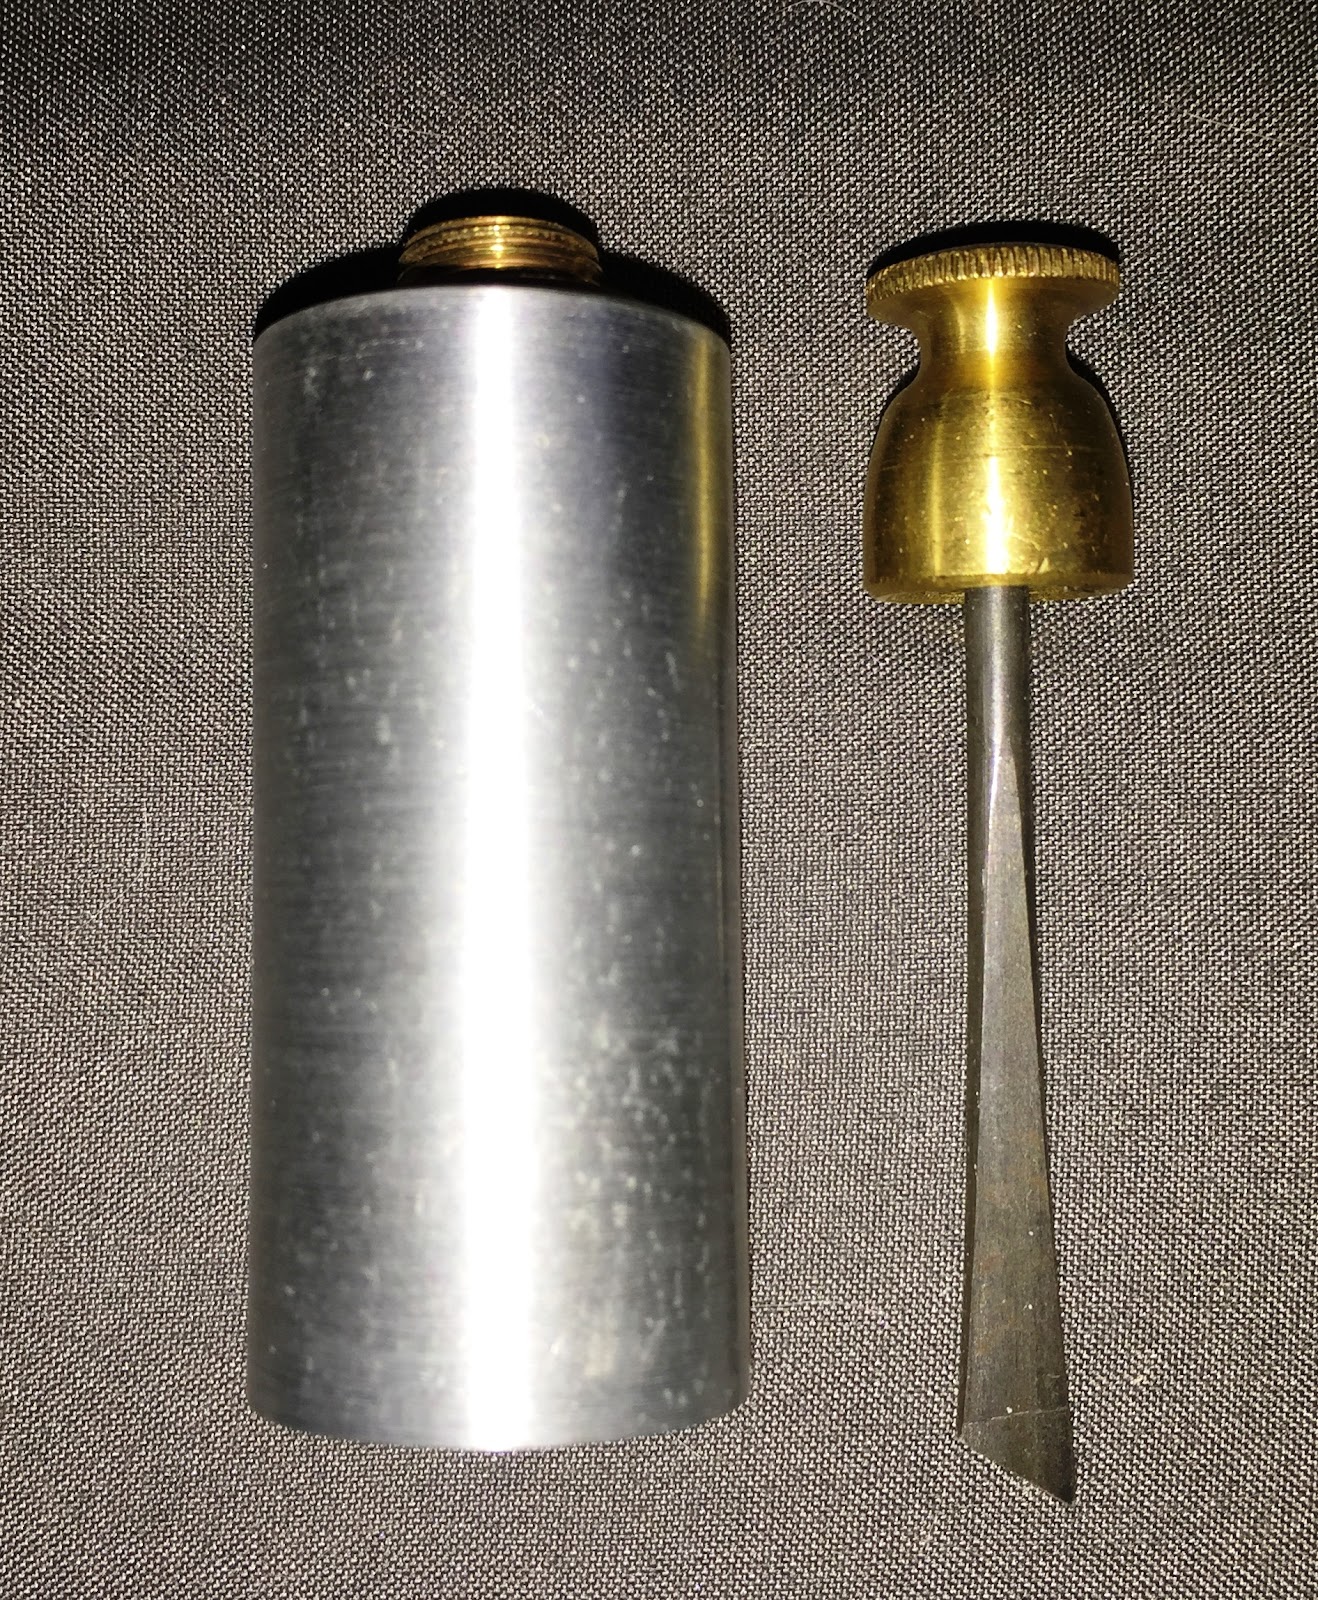
Interior of the ball bag showing ten loose rounds, an oil bottle, and a rag.

The oil bottle.

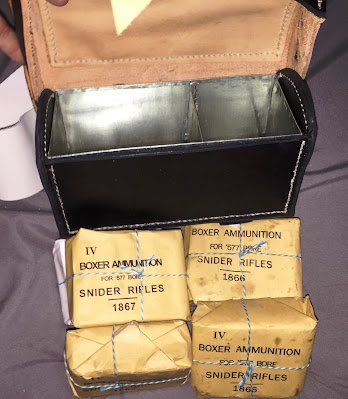
My cartridge box with 50 rounds of wrapped ammunition.
Fifty rounds in the cartridge box.
The implement compartment under the lid of the cartridge box.
The cartridge box, closed.

The standard issue canteen for British troops at this time was the 1862 pattern, however, these weren’t issued in India, which is where the 4th Foot was before being shipped to Abyssinia.  There, troops received locally sourced soda water bottles with leather covers and slings (Barthorp 1994 p. 17), and it is these water bottles which were probably carried by the 4th in this campaign. Mine comes from Regimental Quartermasters.
My Indian Mutiny-style water bottle.

The pattern-1867 haversack was made of linen or cotton and was changed from the previous versions by adding a sliding buckle to make the shoulder strap adjustable.  In addition, this pattern had a button on the back so that when not in use the bag could be rolled up and buttoned (Turner 2006 p. 25). Although the haversack was normally used for the food ration, I use mine for shooting supplies such as a cleaning kit, target markers, notebook and pen, etc. My haversack comes from Regimental Quartermasters.

My haversack, shown open.

My haversack buttoned up for carry when empty.

My Snider is a Mk. III model made in Nepal in 1868, and thus it is impossible that it should have seen service in Abyssinia. Rather, the rifles used at Magdala were almost certainly Mk. II’s, although, again, I am perfectly content with this anachronism.  I purchased my rifle from a private collector.  Since Sniders were converted from the earlier 1853-pattern Enfield rifle (and even the new-built Mk. IIIs were of precisely the same design at the muzzle), the 1853-pattern bayonet and scabbards were still in use. My bayonet is from 1864 and was used during the American Civil War, but the scabbard is a modern reproduction. They were purchased from a private collector.  The rifle sling used in the Abyssinian campaign was probably the 1850 pattern with a buckle on the rear, however my sling is the 1871 pattern which was the last buff-colored version and was attached with a leather thong rather than a buckle (id. p. 44), which was the type used on later Sniders such as mine. My sling comes from Pierre Leather.  The ammunition carried was made with a mold sold by X-Ring Services using brass from the same company.

My Mk. III Snider-Enfield Rifle.

My Enfield bayonet.

Finished Snider cartridges.

Nota bene:  Of course, if I were an actual Snider "rifleman," I'd have a two-band Snider and my leather gear would be black.  I hope my readers will appreciate the linguistic nuances of my word choice for the title of this essay.

WORKS CITED
Barthorp, M. and D. Anderson. The British Troops in the Indian Mutiny 1857-59. London: Osprey Publishing, 1994.

Barthorp, M. and P. Turner. The British Army on Campaign 1816-1902 (3): 1856-1881. London: Osprey Publishing, 1988.

Farwell, Byron. Armies of the Raj: From the Mutiny to Independence, 1858-1947. New York: W. W. Norton, 1989.

Stanley, Henry M. Magdala: The Story of the Abyssinian Campaign of 1866-7. London: Sampson, Low, Marston & Company, 1896.

Turner, Pierre. Soldiers’ Accoutrements of the British Army 1750-1900. Wiltshire: The Crowood Press, 2006.

SUPPLIERS

Stan Dolan, Regimental Quartermasters <www.regimental-quartermaster.com/>

Graham Humphrey, Graham the Leather Guy <grahamtheleatherguy@gmail.com>

Martyn Robinson, X-Ring Services <xringservices@yahoo.com>

Le Pierre Sutler <www.lepierreleathers.com/>

Range Report 18OCT2026: Remington Rolling Block Workup

My Rolling Block along with loose cartridges, packages of ammunition, and a period-correct tool. I was fortunate enough recently to acquire ...