Thursday, January 18, 2024

No One Cares About Your Group Size

Talk to someone who has just come from the range, and in the majority of cases the first thing you’ll hear is the “group size” he achieved, by which he means the extreme spread of a group of shots.  The title of this article notwithstanding, group size does have some validity as a gauge of accuracy, but not a lot, especially taken by itself.  In this article we will explore why group size is a relatively meaningless way to analyze a shot group and the things that really should be considered in addition to group size.

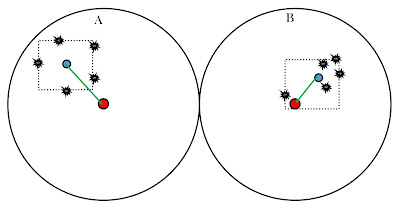
Consider the two hypothetical target pictures here.  The starred black dots are the bullet hits, or “Points of Impact” (“POI”).  The dashed black rectangle represents the extreme size of that group of shots—the “Group Size.”  The red dot is the bullseye that the shooter was trying to hit, which we will call the “Intended Mean Point of Impact” (“IMPI”); in other words, he wanted his group of shots to be as close to that point as he could make them.  The blue dot marks the actual center of the group of shots, or the “Mean Point of Impact” (“MPI”) of the group.  The green arrow is the distance from the MPI to the IMPI.

Looking at the two targets, note that the black dashed rectangle is exactly the same size in both, which means that both groups have identical group sizes.  Yet even a casual glance at the targets will show that the group shown on Target A is far worse than that on Target B; anyone can see that, even without the information in this article.  Regardless, let’s go on an and analyze why B is better than A with an eye toward understanding how we should be gauging our shooting results.

In a perfect string of shots, all the POI would be exactly on the IMPI—in other words, every bullet would hit the bullseye directly and all the bullets would go through the same hole in the target.  In reality, that almost never happens, so a more realistic way of stating the goal is that we want two things:  First, we want the group to be as small as possible, and second, we want the center of the group of shots to be as close to the IMPI as possible.  To do that, we have to have a way of determining the center of the group, which we defined above as the MPI.  We can then simply measure the distance from the MPI to the IMPI.

One of the things that’s obvious when looking at the two targets is that Group A is much more spread out than is Group B.  Although they have exactly the same group size, Group B’s shots are much more closely packed together, with only one sloppy shot and one flyer.  Thus, it’s obvious that just knowing the group size tells us very little.  A better gauge is to calculate the Mean Radial Deviation, which is defined as the average straight-line distance of each shot from the MPI.  In the nineteenth century this was sometimes called the “Figure of Merit” (see link below).

The next thing that’s obvious about these targets is that the MPI of Group A is much farther from the IMPI than is the MPI of Group B—almost twice as far.  That means that not only is Group A “sloppier” than Group B, it’s also less accurate.

From this, it should be obvious that three things need to be considered when judging a group of shots:  First, the group size; second, how closely the shots are packed together; and third, how close the center of the group of shots is to the bullseye.  So knowing the group size is fine, but it really tells us very little.

This article was intended as a discussion of why group size isn’t nearly as important as it is generally taken to be rather than a “how to” piece.  To learn more about the Figure of Merit (mean radial deviation) and how to calculate it, including a link to a video demonstration of how to do it, see the article here:  The Figure of Merit.  Also, regular readers of this blog will probably be sick of reading about it by now, but the String Test is a faster, easier way to gauge all three factors discussed above in a single number; to learn more abut it, see the article here:  The String Test.

Saturday, November 25, 2023

Range Report 25NOV2023 Part II: Practicing with the Uberti Colt New Model Army


In part I of this range report I wrote about the experiments I have conducted with my replicated M1873 Colt .45 ammunition, believing that discussion sufficiently different from and unrelated to my subsequent practice with my Colt new Model Army reproduction as to need to be addressed in a separate article.

In part II, I will discuss today's range practice with my Uberti reproduction of a Colt New Model Army revolver, often called the Colt 1860 Army today.  I wrote a few weeks ago about comparing Johnston and Dow combustible cartridges with Kerr cartridges in my Colt (see the article HERE), but that shooting was all done from a rest to take the human factor out of the equation as much as possible in order to focus on the ammunition.  In this practice session I used only Kerr combustible cartridges, and all shooting was done offhand in order to test and improve the accuracy (not precision) of my shooting.  In addition to normal shooting, I also shot a table of fire using the "snap shooting" technique described in Captain Stanhope Blunt's Instructions in Rifle and Carbine Firing for the United States Army from 1889.

Given the fairly rudimentary sights on Civil War revolvers (especially Colts!) and their lack of adjustability we have to ask how important they were in actual combat, as opposed to in target shooting.  Captain Blunt suggested ignoring them completely and learning to aim instinctively, as if pointing your finger, saying:
832. Owing to the unsteady support that the hand gives to the weapon the methods of aiming previously prescribed for the rifle and carbine cannot be advantageously followed; this is especially true of the practice mounted, where the motion of the horse and the very limited time available for the delivery of the fire permit neither the steadiness nor deliberation so requisite for success with the other arms.
833. The best results will then be obtained by following the method of snap shooting; for which the pistol should be held raised and then quickly projected at the mark and fired without pause or any effort to align it upon the object, the action being somewhat similar to that employed in throwing a missile from the hand and from the same raised position of the arm. (Blunt 1889 p. 309.)

Blunt gave the following directions:
838. The clasp of the thumb and second and third fingers should be firm, the first finger being on the trigger and the little finger underneath the end of the handle. If the clasp is too high up on the handle the muzzle will be elevated; if too low, the muzzle will be depressed. The clasp should not be so tight as to communicate tremor to the pistol, yet sufficiently firm to sustain, when firing with ball cartridges, the force of the recoil. After the discharge the position of raise pistol will be resumed.
839. These motions will at first be executed rather slowly, the instructor correcting the positions if necessary, and the motions quickened as the soldier acquires the habit of leveling or projecting instinctively the pistol in the same man-ner that the forefinger would be pointed at an object. (id. p. 311.)

I strongly suspect that this method, or something very like it, was the norm in combat during the period, and, indeed, beyond, as it presages the later "point shooting" technique taught by Fairbairn, Applegate, Sykes, and others during WWII.  I do not practice this technique as often as I should, but plan to focus more heavily on it in future.  Normally, when practicing snap shooting I don't determine a String Test measurement (see below), instead opting to draw a 14 inch circle around the aiming point and simply calculating the number of hits within that circle since it's not a target technique, however, today I neglected to prepare any targets with circles, so I chose to use the string Test, and was pleasantly surprised by the results.

My ammunition was combustible cartridges with nitrated paper shells containing 25 grains of Schuetzen 3F powder under a Kerr bullet and dipped in a mixture of beeswax and tallow taken from the 1861 Ordnance Manuals.  To learn more about how I make combustible cartridges, read the article HERE.
Kerr combustible cartridges.

I judge the accuracy (as opposed to precision) of my shooting using the 19th-century method called the String Test, a system vastly superior to just looking at the group size since it takes both group size and the distance from the group to the intended mean point of impact in a single figure.  To learn how to use this system and why all historical shooters should do so, read the article HERE.

My Colt NMA, ammunition, and accouterments.

Shooting Conditions:  Lytle Creek Range, bright and sunny, 42 degrees, wind 9 mph (gusting to 22 mph) from 10:00, 52% humidity, barometer 30.08 inHg.

All shooting was done offhand at 15 yards using a full sight while aiming off to adjust fire.  Table of Fire Five was done using the above-mentioned snap shooting method.  Note that this article begins with Table of Fire Four because the first three Tables of Fire were done with my Colt conversion revolver, as discussed in part I of today's range report.

Table of Fire Four.
Table of Fire Four
6 rounds, string measurement 17 inches.
String Test: 2.8 in./rd.

Table of Fire Five: Snap Shooting.
Table of Fire Five: Snap Shooting
6 rounds, string measurement 19 inches.
String Test: 3.2 in./rd.
Note how the line of shots track down as I sought to overcome the first high shots, but how I drifted left in so doing.

Table of Fire Six.
Table of Fire Six
6 rounds, string measurement 11.5 inches.
String Test:  1.9 in./rd.!!!

Table of Fire Seven.
Table of Fire Seven
5 rounds, string measurement 12.5 inches.
String Test: 2.5 in./rd.

Table of Fire Eight.
Table of Fire Eight
6 rounds, string measurement 15.5 inches.
String Test: 2.6 in./rd.

Table of Fire Nine.
Table of Fire Nine
6 rounds, string measurement 14.5 inches.
String Test: 2.4 in./rd.

Conclusions:
I don't normally write blog posts about routine practice sessions unless I am conducting some kind of comparison or experiment, but I thought this session was sufficiently interesting to warrant posting it because the Colt NMA is new for me (this is my first actual practice session with it) and because of the snap shooting trial explained above.

As I have said before, I believe (although I can't prove it) that snap shooting of one sort or another was far more common in combat than any kind of aimed target-style shooting.  What I found particularly interesting today was the rather excellent String Test I achieved, which reflects a lot closer hitting than I usually get.  Although I have never done a String Test with snap shooting before, believing that since it's combat shooting all that counts is the ability to hit a man's chest somewhere, I can still see from previous experiences that the groups I got with my Remington New Model Army were larger than the group I got today with the Colt--and believe me, as someone who vastly prefers the Remington, that's hard to write.  I attribute this to the better balance of the Colt in my hand, a factor that really seems to matter a lot with snap shooting.  I plan to practice this a lot more.

The other shooting results pleased me as well.  This Colt shoots closer to point of aim thand does my Colt Navy, which means that I don't have to guess in aiming off, which leads to better consistency, which is the key to a good String Test result.  My personal standard of acceptable accuracy is a minimum of 3 in./rd. at 15 yards, and with my Remington I have been consistently getting sub-2 inch results, which I consider to be not only good, but probably at or near the limit of the accuracy of the piece.  I consider Colts to be inferior weapons in almost every way, so to come close to that kind of result today (albeit with only one sub-2 inch result) is extremely gratifying.

Still, the only easy day was yesterday, and the only score that's good enough is one better than any you've done before, so I have a lot more practice to do.

Range Report 25NOV2023 Part I: Replicating the M1873 .45 Colt Cartridge

In a break from my normal practice, I am dividing today's range report into two parts.  In this one, I will discuss my efforts to replicate the military's M1873 cartridge in .45 Colt (remember, there's no such thing as .45 Long Colt).  I should start by saying that a perfect reproduction is impossible, for several reasons, as will become apparent below; rather, this is my attempt to reproduce the cartridge as closely as I can using modern brass and priming with an eye toward at least getting the external ballistics right.

Fig. 1: Early military .45 copper Colt cartridges with the Benet primer. (Left, M1873 Colt, center and right, Schofield .45 Short Colt.)
Fig. 2: The M1873 Cartridge after Kuhnhausen 2001.

The M1873 is the first of the .45 Colt metallic cartridges used by the U.S. military.  They were made of copper rather than brass and employed a rather unusual priming system called the Benet primer invented in 1866 by Stephen V. Benét.  This system included a small cup containing fulminate of mercury (see figure 1 above) which was crimped inside the copper case.  From the outside, this looks like a rimfire cartridge, but as the picture above shows, it is not.

The ball used in the M1873 weighed between 250-255 grains, and had two grease grooves and a hollow base (see figure 2 above).  This was loaded over 30 grains of 2F black powder (yes, 2F, that is not a typo).

Fig. 3: Comparing the Accurate Bullet Mold bullet (left) with the original design (right).

In order to replicate the bullet used in the M1873 cartridge I contacted Accurate Bullet Molds for a custom mold.  The mold they provided yields a bullet which is very close to correct, but differs from the original in two respects (see figure 3 above).  First, the Accurate bullet has a crimp groove while the original does not, and second, the original has a hollow base, which my bullet does not.  The originals didn't use a crimp groove for reasons which are obscure, but appear to be related to the difficulty of mass production of metallic cartridges in period.  The hollow base can't be easily replicated by the method Accurate Bullet Molds uses to make their molds since it requires a special insert, but it turns out to be unnecessary.  The original bullet was .452 (to make it easier to load into early loading machinery) and it was felt that the hollow base would be necessary for the bullet to obturate into the rifling, but the Accurate bullet is .454 and doesn't need to obturate for proper fit so there is no need for a hollow base.  The Accurate bullet is .454 in diameter and weighs approximately 255 grains.

I load my cartridges into Starline center-primed brass cases (incidentally, the civilian version of the 1873 cartridges were brass and had center primers, much like mine).  To read about how I load the cartridges, read the article HERE.

Fig. 4: A batch of my replicated M1873 cartridges.

As the article in the link above shows, I started with 35 grains of 3F powder, but since I want to replicate the M873 correctly I have switched to using only 30 grains.  I believed that the 2F powder originally used in the M1873 cartridges would be less accurate since 2F takes longer to combust fully in a revolver barrel (which is why 2F is normally used for rifles while 3F is normally used for revolvers), so today's range session was intended to compare the two types of powder to see which was more accurate, and to see which came closer to the original in terms of muzzle velocity.  Unfortunately, my chronograph gave obviously spurious results (ranging from more than 3,000 fps to under 300 fps for the same loads), so that determination remains to be examined.  As to accuracy, however, my prediction failed, with the 2F and 3F having almost exactly the same accuracy, with the 2F being a very, very slight bit better (small enough to be within the margin of error of such a test).

Conditions:  Lytle Creek Range, bright and sunny, 42 degrees, wind 9 mph (gusting to 22 mph) from 10:00, 52% humidity, barometer 30.08 inHg.

All shooting was done with my Colt 1860 Conversion revolver from a rest (to take the human factor out of the equation as much as possible) at 15 yards.  All shooting was done at a 3 inch black dot using a full sight and a 6:00 hold without aiming off.  I fired three tables of fire, with 12 rounds with 30 grains of 3F Schetzen, 12 rounds with 30 grains of 2F Schuetzen, and 6 rounds of 35 grains of 3F Schuetzen.

I used the String Test to gauge the accuracy of my shooting.  To learn how the system works and why anyone doing historical shooting should be using this superb system to gauge accuracy, see the article HERE.

Fig. 5: Table of Fire One.

Table One:  30 grains of Schuetzen 3F.
12 rounds, string measurement 31.5 inches.
String Test: 2.6 in./rd.

Fig. 6: Table of Fire Two.
Table Two: 30 grains of Schuetzen 2F.
12 rounds, string measurement 29.5 inches.
String Test: 2.5 in./rd.

Fig. 7: Table of Fire Three.
Table Three:  35 grains of Schuetzen 3F.
6 rounds, string measurement 15.25 inches
String Test: 2.5 in./rd.

Conclusions:
My goals today were first, to see how close my replication of the M1873 cartridge was to the original, and second, to compare the accuracy of using 3F vs. 2F powder.  Finer 3F powder has always been used for revolvers, with short barrels, because it is completely consumed sooner (contrary to popular belief it does not burn any faster than coarser powder) than coarser powder, while rifles, with long barrels, use coarser powder so the bullet is more gradually accelerated in an effort to reduce stripping (in which the bullet starts out too fast and so strips over the rifling).  I expected that using 2F powder would mean that not all of the powder was fully consumed before the bullet left the muzzle, resulting in a lower muzzle velocity and correspondingly worse accuracy.  That expectation was not realized.  In fact, although I couldn't get my chronograph to work correctly and so couldn't compare muzzle velocities, I shot a third table with cartridges containing 35 grains of 3F just for comparison purposes, and got approximately the same accuracy with that load, indicating that the higher muzzle velocity it produces failed to provide any better accuracy.  But then, that's the thing about science:  You hypothesize, then you experiment, and your lovely, elegant hypotheses are often shattered on the harsh shoals of reality.

Check my blog soon for part II of this range session in which I practiced with my new Uberti 1860 Army revolver using Kerr combustible cartridges.  I felt that this experiment with the .45 Colt cartridges was different enough to get its own blog post, however, which is why I split the study into two parts.

Information on the M1873 .45 Colt cartridge in this article comes from:  Kuhnhausen, J. The Colt Single Action Revolvers - A Shop Manual, Vols. I & II. Heritage Gun Books, 2001.

Saturday, November 11, 2023

Range Report 11NOV2023: Comparing the Johnston and Dow and Kerr Cartridges in a Colt 1860

Uberti Colt 1860 with accoutrements and both J&D and Kerr cartridges.

J&D (top) and Kerr (bottom) cartirdges.

I purchased an Uberti reproduction of a Colt 1860 Army with a great deal a trepidation; my experience has been that Uberti's are prettier but Piettas shoot better, and for me, shooting is all.  Still, I got a deal, so I bought the revolver.  I took it to the range and was incredibly disappointed--it was extremely inaccurate, it had the tiniest most useless rear sight notch I had ever seen (the Piettas are much more functional), it had a weak spring which meant the caps often didn't go off, the hammer was very sharp which lead to constant cap sucking, and it never seemed to go together quite right (because of arbor problems endemic to Ubertis).

Still, I see all of the cap and ball reproductions as "kit guns" that require extensive work, so as I have with all my other revolvers, I sent this off to Gary Barnes (https://www.facebook.com/cartridgeconversion) to have it reworked.  Mr. Barnes, as usual, worked wonders.  He  did a trigger/action job, adjusted the forcing cone, reamed the chambers to a correct and uniform diameter, resurfaced the hammer to reduce cap sucking, corrected the horrible wedge/arbor problem that Ubertis typically have, stripped and refinished the grips, and, most importantly, opened the loading port so I can shoot correct ammunition instead of having to waste my time with round balls.  I also replaced the crappy nipples with Slix Shot nipples, which are essential for good shooting.

Today was my first chance since getting it back to take the revolver to the range, so I thought it would be interesting to use it to do a comparison between the Eras Gone Johnston and Dow ("J&Ds") bullets and their Kerr bullets.  I tend to prefer the Kerrs because they have a wider base for attaching the envelopes for paper cartridges, whereas the shoulder on the J&Ds is a bit smaller, making getting the envelope to sit correctly a bit more problematic.  Honestly, I just need to develop a pattern specifically for the J&Ds and it should be less of a problem, but I make so many Kerr cartridges I have refined my pattern to be ideally adapted to the Kerr.  To learn how I make combustible paper cartridges, go HERE.

Precision is a measure of the consistency of a specific weapon with specific ammunition, disregarding the shooter as much as possible; it's basically similar to, although far superior to, group size.  It should always be done from rest (to take the shooter out of the determination as much as possible).  Originally, my intention had been to focus on the precision of the this revolver and ammunition using the Figure of Merit ("mean radial deviation") system to compare the two cartridges, but honestly, as will be seen below, the groups were so tight and close that it would be hard to mark the individual hits precisely, especially since many of them went through the same hole.  To learn more about how the Figure of Merit was used in the nineteenth century, read this ARTICLE.

When I saw how tight the groups were, however, I decided that the Figure of Merit would be pointless, so I just calculated the String Test instead, counting all the rounds that went through the same hole as being the same distance from the Intended Mean Point of Impact.  To learn how to gauge accuracy (not precision) using the String Test, read this ARTICLE.

Shooting Conditions:  Bright and clear, 58 degrees, Wind 8 mph from 11:00 (gusting much higher), 19% humidity, Barometer 30.11 inHg.

All shooting was done at 15 yards from a rest; the sight picture was a 6:00 full hold at the bottom of the 3" black disk on the target.  I fired 12 of each cartridge type.  Each was made identically with 25 grains of Schuetzen 3F powder.

Table One:  Johnston and Dow
12 Rounds, String Measurement 13.25 inches.
String Test:  1.1 in./rd.

Table One: Johnston and Dow.

Table Two: Kerr
12 Rounds, String Measurement 9.0 inches.
String Test:  0.8 in./rd.

Table Two: Kerr.

Conclusions
In all honesty, I don't know what I was expecting, but this wasn't it.  I did expect the revolver to shoot higher than it did--my Colt 1851 Navy certainly does, and Colts are notorious for that.  These kinds of results are phenomenal, even allowing for them being made from rest, and I couldn't be more pleased.  Honestly, the two bullet types seem functionally identical--the slight difference could be a matter of me twitching as I shot.

I had intended to chronograph the cartridges as well, however, I forgot my chronograph.  I am planning to to a head-to-head comparison between my Remington NMA and this Colt soon, so I will get chronograph results then.

Despite these superb results, the day was not without problems.  The Uberti spring is still too weak, and almost 1/3 of the caps failed to go off the first time they were struck.  In addition, I had intended to shoot the same test offhand, comparing the cartridges that way.  Unfortunately, I had some J&D cartridges I made using cotton rag paper that I wanted to test, but when I tried to fire them they refused to ignite at all, even after repeated caps.  Since I didn't have the tool I use to remove bullets from the chamber, that put an end to today's shooting.  In truth, it's just as well, however, since the rear sight on this revolver is practically unusable--the notch is far smaller than in my Pietta Colts, and the front sight can barely be seen through it, so offhand shooting would have been extremely difficult.  I will have to work on opening the rear sight notch up more.  Finally, although the work Mr. Barnes did on the hammer face prevented the cap sucking which so plagued this revolver right out of the box, and the Slix Shot nipples heled reduce cap jams, caps were still a problem.  None jammed so badly that I had to disassemble the revolver, but I constantly had to use a small pick to remove pieces of spent caps.  Once again, I return to my conclusion that Pietta are far better than Ubertis, and Remingtons are far better than Colts, although I confess I like the balance of the Colt slightly better.  Watch for a coming article comparing my Colt and Remington.

Sunday, October 29, 2023

Range Report 29OCT2023: Choosing a Target for Practical Shooting Practice


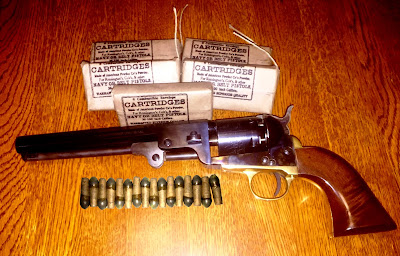
My Pietta 1851 Colt Navy with Richmond Lab combustible cartridges in historically correct cartridge packets.

In this post we will discuss the idea of using a style of target that more realistically replicates combat shooting in period, and the effect that type of target can have on shooting results.

Most mid-nineteenth-century military arms were not adjustable for windage in the field, and many were not adjustable for elevation, either, especially revolvers.  This meant that soldiers had to “aim off” to allow for distance, environmental factors (e.g., wind and target motion), or inherent inconsistencies in the weapon itself.  The quality, design, and/or placement of the sights can have a significant effect on aiming off, with better sights allowing for faster target acquisition and a more consistent sight picture. 

Many militaries in this period, including both The US and Britain, taught their soldiers to aim at an enemy soldier’s belt buckle, and then to aim off from there as necessary.  Most weapons shot a bit high, especially at closer ranges, so this would generally result in a hit in the body cavity.  Modern shooters, however, tend to take targets to the range which are marked with concentric rings to aid in aiming off, and that’s perfectly valid if the shooter is studying historical target shooting.  For those interested in military or practical shooting, however, such targets are artificial and misleading—their enemies weren’t marked off that way.  For this reason, I make most of my targets with white paper and a three-inch black stick-on disk (I should probably use a two-inch disk as being closer to the size of a belt buckle); there are no concentric rings or aiming aids (NB: I do use a recreation of the Snider qualification target for shooting with my Snider).  Of course, this applies to fine adjustments—for grosser adjustments other aiming points might be possible, such as the knee line or shoulder line.

Using this kind of target means that when I have to aim off I have to estimate the approximate shift each time—I can’t just calculate that my target is X yards farther than the point blank, so I have to aim at the next ring out on the target, I have to estimate both the amount of shift in the first place, and then estimate how far that is on the paper with each shot, just as a soldier would have had to do.  I have no point of aim, I’m just guesstimating the shift and aiming for a blank spot on the paper that I hope is the correct distance from my Intended Mean Point of Impact.

With weapons which shoot to point of aim this isn’t really a problem:  I aim for the black sticker and that’s good enough; for minor adjustments, I can take a 6:00 or 12:00 hold or a right or left edge hold, all of which give me exact aiming points.  With a weapon that does not shoot to point of aim, however, I’m stuck guesstimating the sight picture each time I pull the trigger.  My Remington New Model Army shoots close to point of aim, so I know that if I take a correct sight picture using a full sight and 6:00 hold I will get String Tests which are consistently under two inches per round at fifteen yards.

My 1851 Colt Navy, however, shoots quite high—approximately six to eight inches at fifteen yards.  Therefore, I have to aim off and put my sights on a blank spot on the target paper, hoping I am both correct in my shift and consistent with previous shots, but that’s extraordinarily difficult to do without an exact point at which to aim.  This means my groups tend to be less consistent with the Colt than they are with my Remington, which means the String Test score is much worse.  This doesn’t mean the Colt is inherently any less accurate than the Remington, it just means that the results come out that way.  As a result, my String Tests with the Colt are in the 4.5-3.5 in./rd. range—far worse than the Remington, and worse than my minimum goal of 3 in./rd.

The extremely poor sights on the Colt are one factor in these results.  The tiny front sight is a large part of why the revolver shoots high (just as they tended to in period) and is hard to line up correctly in the small V in the rear sight, and the rear sight being in the hammer means that it isn’t always at exactly the same place in relation to the front sight as it would be with fixed sights.

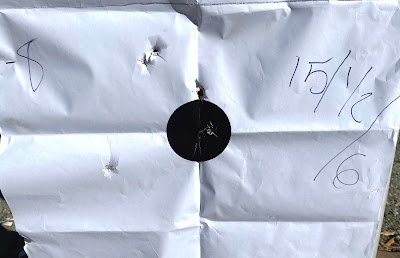
I usually post all shooting results for the day in these range reports, but this post is really about the notion of choosing a target for realistic shooting rather than to show my results.  Regardless, here is one target showing Tables Four and Five.  As this shows, I managed 3.7 in./rd. for Table Four and 3.2 in./rd. for Table Five, two of my best scores for the day, but neither meeting my minimum standard of 3 in./rd.  Both Tables of Fire were shot offhand at fifteen yards using paper cartridges loaded with Richmond Lab bullets over 17 grains of Schuetzen 3F powder and were greased using the 1861 Ordnance Department recipe.

Tables Four and Five.

The two conclusions I want to make here are first, that it takes a lot of practice to learn to aim off when using simple point targets, and second, that anyone seeking to understand historical military or practical shooting (as opposed to Victorian target shooting) should experiment with a simple “point” target like this in order to understand how aiming off really had to be done.  Also, of course, stop using the almost meaningless group size as a way of gauging accuracy and switch to using the String Test, both because it is more historically correct but also because it is so much more meaningful (to read about the String Test and learn why it is important and how to do it, read the article HERE).

Saturday, September 30, 2023

Range Report 09302023: .45 Colt Shootoff

Today's range practice was entirely devoted to the .45 Colt (not "long Colt," Plese!) cartridge.  I shot my Pietta 1860 revolver, which had been converted to fire .45 Colt with a Kirst Konversion system, against my Pietta Remington New Model Army with a Howell conversion cylinder to compare and contrast the weapons.

My Colt Conversion Revolver and ammunition.
My conversion revolver started as a normal Pietta Colt 1860 Army.  I purchased a Kirst Conversion for it because I thought it would be interesting to have a cap-and-ball revolver that was actually converted to shoot metallic cartridge ammunition rather than buying one of the ready-made Richards-Mason conversion reproductions on the market.  This was a huge mistake.  The Kirst system, I am sorry to say, is not optimized for the current batch of reproduction revolvers (I understand that they used to be better), and as the Italian companies have tweaked their designs slightly over time Kirst has failed to keep up with them, and, in addition, have implemented cost-saving measures in their own production process which made them even worse.  I sent the kit and my revolver to Gary Barnes (see the link HERE) to have the revolver converted because Mr. Barnes had done spectacular work on other cap and ball revolvers I own (including the Remington I shot today), but, unfortunately because of the above-mentioned problems, the revolver had to go back twice to make it function correctly.  I finally have the revolver in good working condition (but see below), so today was supposed to be the acid test.
Howell conversion cylinder.

I thought it would be interesting to compare the conversion revolver against a standard cap and ball revolver using the Howell drop-in conversion cylinder, so today that's what I did.  Both revolvers have been extensively reworked by Mr. Barnes for accuracy and reliability, with trigger/action jobs, forcing cone adjustments, muzzle corrections, etc., although the Howell cylinder is stock.

.45 Colt ammunition in a period-correct Frankford Arsenal cartridge package.
My ammunition is as close as I can make it to the M1873 military cartridge (except for the Benet primer), with 35 grains of 3F Swiss powder (a few rounds had Schuetzen today, but I didn't track which ones they were) under a 250-grain lead bullet.  For information about how I load .45 Colt ammunition, see the article I wrote HERE.

For the purpose of comparing accuracy I used the String Test, a method dating to before the Civil War which takes group size and the distance from the center of the group to the point of aim in a single measurement.  All historical shooters should be using this process to gauge their accuracy--please, no more "group size" numbers!  To learn more about the String Test and how to use it, along with a video link, see HERE.  Note that I should really have used the Figure of Merit calculation for the purpose of this test since it measures the precision of the piece rather than the accuracy of the man and his weapon--more on this below.

Shooting Conditions:  Lytle Creek Range.  52 degrees, heavy clouds, wind from 10:00 at 10 mph (but highly variable), humidity 89%, barometer 29.83 inHg.  All shooting was done at 15 yards from an offhand position.

Tables One and Two (Two isn't marked, but it's the lower dot).
Table One:  Colt Conversion
Rounds: 10
String measurement: 44.25 in.
String Test: 4.4 in./rd.

Table Two: New Model Army
Rounds: 10
String measurement: 28.0 in.
String Test: 2.8 in./rd.

Table Three.

Table Three: Colt Conversion
Rounds: 5 (There was a cease-fire at the range, so I couldn't finish the table fo fire.)
String measurement: 24.0 in.
String Test: 4.8 in./rd.

Tables Four and Five.
Table Four: Colt Conversion
Rounds: 10
String Measurement: 28.0 in.
String Test: 2.8 in./rd.

Table Five: New Model Army
Rounds: 9
String Measurement: 21.25 in.
String Test: 2.1 in./rd.

Table Six.
Table Six: Colt Conversion
Rounds: 10
String Measurement: 27.25 in.
String Test: 2.7 in./rd.

I had several problems come up during this shoot.  As you can see, I only shot two tables of fire with the Remington, and the latter one only had nine rounds.  This is because the catch holding the loading lever broke off during fire after the nineteenth round, so I stopped using it.  The Colt also had a problem wherein the plug holding the ejector assembly to the barrel worked its way out during fire.  The simple fact is that these Italian replicas are not well made (at least in comparison with the originals), and 35 grains of Swiss with a 250-grain bullet is a very stout load.  This is what caused both problems.

Broken latch on Remington.
Colt plug working out; note how this made the ejector assembly sit crookedly.

Conclusions
Both revolvers shot well, it cannot be denied, but the Remington shot much better; this is not a surprise, Remington are simply better designed revolvers (and I don't want any comments about how Remingtons foul faster, in period you would never fire more than a single cylinder or two of ammunition in any engagement, so the fouling issue that arises in modern fantasy shooting sports is irrelevant).  The fixed rear sight on the Remington, together with its higher visibility, makes for better, clearer sight pictures that are faster and easier to achieve and to hold.  In addition, my Colt shoots high, as most of them do, and while you can aim off to adjust for this (note the better scores I achieved as the day progressed, especially the superb group in Table 6), this takes longer to do since you have to take the time to estimate where your sight picture should be.  Aiming off is hard to do consistently, too, unless you have a modern target with rings that you can use for acquiring the sight picture--that's why I prefer the dots I use on my targets as a test of practical marksmanship.  Since the Remington shoots to point of aim, shooting is not only faster, the estimation factor is removed, making for more consistency.  Note that if all of the shots for each piece are combined, the overall String Test results are 3.5 in./rd. for the Colt and 2.6 in./rd. for the Remington.  Finally, note that when using the Remington with paper cartridges I consistently getting String Tests under 2 in./rd., so clearly the heavy .45 Colt charges I'm using here are not optimized for accuracy, they are intended to replicate the military ammunition of the day.

In this comparison I shot offhand and used the String Test.  In fact, although this is the best way to gauge how any given man shoots his weapon, it was the wrong approach here as it is a gauge of accuracy, not of precision.  Precision refers to how well the specific piece shoots with any given load, regardless of who is shooting it.  Precision should be judged by firing from a rest (to take the man out of the equation as much as possible) and should be judged using the Figure of Merit system, which determines the mean radial deviation of each round from the others in a group.  To learn more about the Figure of Merit, including a video demonstrating how to do it), read my article HERE.  The simple fact is that this system is somewhat laborious, and I was just being lazy; besides, the String Test really does compare apples to apples as long as it's being performed by the same shooter using the same process.

Although I should not have used the String Test today, these results played up one of the reasons the String Test is such a useful method for gauging accuracy.  If you look at the groups on the targets in the pictures above, the Colt's groups were not all that much worse than those of the Remington, but the Colt groups were farther from the point I was trying to hit--The Intended Mean Point of Impact--than were those of the Remington.  In combat, being able to hit what you're aiming at matters, so if you have a tiny, tight little group but it's 10 inches away from the spot you're trying to hit (e.g., a head), then that's not nearly as useful as a sloppier group that's mostly hitting the spot for which you're aiming.  This demonstrates why the String Test is so valuable and important, and why we should hear no more about group size.
Saturday, September 16, 2023

Range Report 16 SEP2023: The 1859 Sharps Infantry Rifle

Pedersoli 1859 Sharps Infantry Rifle, cartridges, cartridge packs, and implementia.
Introduction
I had several goals for today:  First, I wanted to see how my new, slightly shorter, linen cartridges fit and fired in my Sharps.  Second, I wanted to compare and contrast my linen cartridges made with the Eras Gone Richmond Labs Sharps bullet with the historically inauthentic Hahn cardboard tube cartridges using the Lyman "Christmas Tree" ring-tailed bullet.  There is a lot of talk about the Hahn cartridges being more accurate at the short ranges used in certain kinds of competitive shooting, and while that kind of shooting has little relevance to what I do, it is still an interesting comparison.  To that end, I shot groups of both cartridges (far more than the results chronicled below) both over the chronograph and at targets to determine the String Test results for both.  For the impatient, the historically correct linen cartridges outperformed the Hahn modern cartridges in both respects, but that is a simplistic answer, and those interested should really read the detailed discussion which follows for a more nuanced answer.

New Cartridges and Cartridge Pack
The new, slightly shorter line tubes worked wonderfully.  I shortened the linen tubes by 0.2 inch, leaving all else the same; they had the same load, I just didn't use as much filler (see below), and they fit the chamber of the rifle better.  None of them got caught in the block when closing it the way the earlier pattern did, even when the chamber was heavily fouled.

I got a .54-caliber bore brush and used it to clean the chamber after every ten rounds, and this helped a lot with the problem of having the base of the cartridges stick out from the chamber to interfere with the rising block, too.  I also swabbed the bore with a wet followed by two dry patches every ten rounds.  I had absolutely no shooting problems while using this routine, which was a great relief after all of the problems I have had getting this rifle to shoot.

Because I shortened the cartridges I wanted to redesign the box I use for making cartridge packs (see the above picture), and since I was doing that I took the opportunity to also make a completely new box design based on one that my friend Barry Geipel designed for the Smith Carbine cartridge packs.  This design is easier to make and is a lot more secure since it has larger tabs to hold it together.   I will be using Barry's design for my Smith cartridge packs, too, once the ones I already made wear out.

Barry Geipel-Style cartridge pack box.

The Cartridges
The linen cartridges were made with linen shells and contained 65 grains of Schuetzen 2F powder, cornmeal filler, and a 530-grain soft lead bullet cast using the excellent Richmond Labs Sharps mold from Eras Gone Bullet Molds.  The bullets were dipped in my historically correct bullet lube recipe taken from the 1861 Ordnance Manual.  They are close to being perfect reproductions of cartridges used in period (although the North didn't use the R.L. bullets, no one offers a mold to reproduce the correct Federal style bullets).  For a detailed explanation of how I make and package these cartridges, read my blog post on the subject HERE.

My linen cartridges (ungreased).

The Hahn cartridges are made using the modern Lyman version of a ring-tailed Sharps bullet inserted in a cardboard tube for ease of manufacture, and are not at all authentic in design or construction.  They include 55 grains of Schuetzen 2F powder, and the bullet weighs about 490 grains.  The cardboard tubes are sold by Charlie Hahn.

Hahn cartridges.

Muzzle Velocity and Energy
Naturally, the results will be very different for these cartridges.  My linen cartridges have the standard government load of 65 grains of rifle powder under a bullet that weighs 530 grains, while the Hahn cartridges have 55 grains (ten less) with a bullet that weighs 490 grains (about 40 less).

The linen cartridges had an average muzzle velocity of 919.7 feet per second which yields a muzzle energy of 995 foot-pounds.  Unfortunately, I do not have any information about the muzzle velocity of the historical cartridges, so I can't make a comparison.

The Hahn cartridges had an average muzzle velocity of 762.7 feet per second, for a muzzle energy of 633 foot-pounds.

I used this calculator to determine muzzle energy:  http://ballistics101.com/muzzle_energy_calc.php

Accuracy
As always, when judging accuracy I use the String Test that was used during the 19th century.  To understand the String Test and why it is the superior method for determining accuracy read my blog post HERE.  In fact, however, what I should have been comparing was the precision of the shots, not the accuracy.  Accuracy is a gauge of the man and how well he shoots a given piece, whereas precision is a gauge of the weapon, with the man removed from the equation as much as possible.  For precision, the Figure of Merit is a better gauge and is what I should have used here, but I was feeling a bit lazy, and since I shot both sets of shots in exactly the same way I believe the accuracy score still gives me what I wanted to know.

Conditions:  Lytle Creek Range; bright and sunny; wind 2 mph from 4:00; humidity 52%; barometer 20 in.Hg.  Range: 100 yards.  Shooting position: Seated Unsupported.  Full sight.

Table One:  Hahn Cartridges
Rounds = 10
String measurement: 49.0 in.
String Test:  4.9 in./rd.

Table One: Hahn Cartridges.
Table Two:  Linen Cartridges
Rounds = 10
String measurement: 45.25 in.
String Test:  4.5 in./rd.

Table Two: Linen Cartridges.

Conclusions
Clearly, the linen cartridges have significantly better terminal ballistics, with 362 more foot-pounds of energy than the Hahn cartridges, which speaks volumes to the intended use of the Sharps Rifle as a weapon for skilled skirmishers and designated marksmen (although that term wasn't used in period) who routinely engaged targets in excess of 500 yards, and sometimes double that.  Not surprisingly, the Sharps has a muzzle velocity roughly comparable to that of the 1861 Springfield Rifle used in the war (despite having a shorter barrel), and a significantly slower muzzle velocity than the contemporary P-53 Enfield Rifle which had a muzzle velocity in excess of 1,200 fps.

The String Test numbers, however, are much closer, a mere 0.4 in./rd., which surprised me greatly.  The Hahn cartridge is widely held to be better for this kind of short-range shooting (which is why it is more popular with modern target shooting groups), a fact which I was sure wasn't correct, and although I was right, I expected the linen cartridges to actually outperform the Hahn cartridges by more than they did.  In truth, I should have fired from a rest, and I should have kept the same sight picture for every shot instead of trying to adjust fire for better accuracy because that would have given a more realistic analysis of the precision of the cartridges, and I think the Hahns would have fared worse in that comparison.  Regardless, I think these results are still clear, just not as definitive as they could be.

Range Report 14JUN2026: Comparing the Smith and Burnside Carbines

I spent my Sunday at the Church of the Holy Black Powder.  Among other things, today saw a head-to-head comparison between my Burnside and S...