
Introduction
At least three different versions of Enfield cartridges were made during the service life of the rifle, which we might call the “Pritchett cartridge,” the “Hay Cartridge,” and the “Boxer cartridge” respectively. Here we will limit our discussion to the making of Boxer cartridges, which used the undersized .550 Boxer-style bullet.
Enfield cartridges are quite complex by comparison with some types of paper cartridges (although the design was common in Europe), which tended to be simple tubes to hold a bullet and powder. Three types of paper are used: A stiff paper tube forms the base of the powder chamber, which is wrapped with a thicker paper to complete the powder chamber. The powder chamber is mated to the bullet and both are rolled together into a very thin paper, the outer wrapper, which is tied off at the base of the bullet with twine. A “gummed band” is then used to secure the powder chamber inside the outer wrapper.

 |
| Forth Armory kit. |


2. The board I use for making cartridges, with a choking cord and a supply of twine for tying off the cartridges.

3. Lay the stiffener as shown with the mandrel aligned with the long edge of the paper.

4. Roll the stiffener around the mandrel, taking care to keep it absolutely straight and tight. Pull it toward yourself with sharp jerks to tighten the wind as you roll. Stop when about half an inch of the short edge remains, as shown.

5. Lay the inner wrapper on top of and inside the edge of the stiffener so that about half an inch of the end extends past the edge of the mandrel.

6. Roll the inner wrapper and stiffener tightly together to form the powder chamber. As with the stiffener, jerk the mandrel toward yourself as you roll to help ensure that it rolls very tightly.


8. Use the bullet-shaped end of the former to drive the end of the paper from the inner wrapper fully into the hollow end of the mandrel.

9. A view of the hollow end of the mandrel with the end of the inner wrapper pushed inside.

10. Lay the powder tube (the inner wrapper and stiffener still on the mandrel) on the outer wrapper, positioned as shown, and lay the bullet as shown, with the nose of the bullet in the hollow. The base of the bullet should be aligned with the end of the three slits cut in the outer wrapper.

11. Roll the bullet and powder tube inside the outer wrapper, then pinch the end of the mandrel with a thumb and forefinger to hold it together.

12. Pull the choking cord under the outer wrapper on the mandrel, aligning the cord with the bottom edge of the bullet.

13. Wrap the choking cord back over the top of the outer wrapper, then change your grip so that the tube is held with the thumb and middle finger while the index finger goes over the end of the paper.

14. Choke the end of the paper tightly (being careful not to cut the outer wrapper).

15. Remove the choking cord and wrap the twine for tying around the end of the fleurette twice, then tie it off with two half hitches.

16. Cut the twine so that the ends do not extend past the edge of the cartridge. Press the paper fleurette flat, and if any of the fleurette extends past the edge of the paper, trim that back, too.

17. Wrap a piece of half-inch masking tape (the green here would indicate civilian manufacture while the official arsenal used white, but both were issued to soldiers) around the seam where the end of the outer wrapper meets the inner wrapper in order to fix them together. Remove the mandrel; it may be tight, so hold the outer wrapper end firmly and rotate the mandrel slightly back and forth until it will come free.
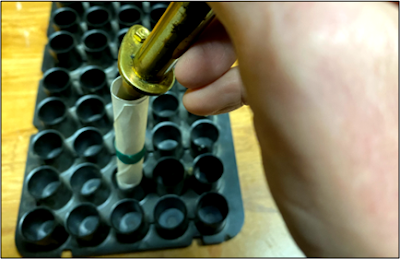
18. Place the cartridge in a rack and add your powder. The original government charge was 2 1/2 drams, or 68.3 grains, of rifle powder. I use 1.5Fg Swiss.

19. Pinch the end of the inner wrapper above the stiffener to squeeze it shut, then twist in the same direction the inner wrapper was wound onto the mandrel, and push downward to seat the tab thus formed in the upper end of the powder chamber.

20. A finished cartridge, showing how the tab is pushed down into the powder chamber.

21. Melt the grease and dip the bullet end of the cartridge into it up to the edge of the shoulder of the bullet. Set aside to cool.
 |
| A finished Boxer cartridge. |
After making the cartridges, they will need to be wrapped for carrying. Watch this blog for a post about how to do that soon.
 |
| A wrapped arsenal pack of ten Boxer cartridges and a wrapped package of 75 percussion caps, both copied from originals. |


No comments:
Post a Comment