Introduction
The most important factors in military long-distance
marksmanship, after learning to load and fire a rifle, were aiming and
judging distance. If a soldier didn’t
know how to use and adjust his sights he would never hit his target, but as or
more importantly, if he didn’t know how to judge the distance to his target he wouldn’t
be able to set his sights correctly no matter how well he understood the
mechanics of doing so, and at any range past 200 yards he was very likely to
miss no matter how perfect his sight picture.
Soldiers spent a great deal of time training in distance
estimation using techniques based on the appearance of targets at various
distances, but in this article we will discuss a tool used in period for
estimating distance using trigonometric principles called, among other
things, a “stadium range finder,” or a “stadiometer.”
Trajectory
In order to shoot well it is necessary to understand what bullets do. The slow speed of black powder rifle bullets and their heavy
weights produced large, rainbow-like trajectories. With modern firearms we expect nearly flat
trajectories, but black powder weapons had much more extreme parabolas. This
means it is necessary to understand the bullet’s path and to judge the distance
well in order to make a good hit.
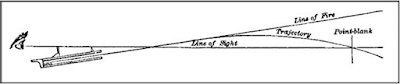
The line of fire is a straight
line extending through the centre of the barrel, indefinitely produced. The line of sight is a straight line passing
through the middle of the notch of the rear-sight and the top of the
front-sight. A ball describes a curved line in its flight, which line is called
the trajectory. When fired from a gun, the ball crosses above the line of sight
after going a certain distance,—according to the arm used,—it crosses below the
line of sight: this point is called the point-blank. Suppose the point-blank of
your carbine to be one hundred yards: to hit an object at that distance, aim at
it; if the object is closer, aim below it; if farther off, aim above it. (Congdon
1864 pp. 34-35.)
Every weapon, and every load used with that weapon, will
have a different trajectory, so it is important to understand the specific trajectory
of one’s own rifle and ammunition in order to learn to use the weapon well.
Point Blank
The idea of the point blank is important for good black
powder shooting but is often misunderstood today; people mistakenly think
“point blank” means “so close you can’t miss.”
As Congdon said, the bullet trajectory crosses the line of sight twice,
once when it first leaves the muzzle and a second time when it drops down to
cross the line of sight again at a farther point, and it is this second point
that is the point blank.
Thus, when using adjustable sights, every sight setting will have a different point blank; “by the use of the hausse or raised sight, the number of points-blank are increased” (Heth 1862 p. 18), so when using the rear sight with the back sight folded down the point blank of many mid-nineteenth-century rifles is 100 yards, but if the slider on the back sight is set for, for example, 500 yards, then the point blank is 500 yards (assuming the use of government ammunition—changing the bullet or load will throw this off). Understanding the point blank when shooting modern rifles is less important because of their flat trajectories, but it is far more so when shooting black-powder firearms with their highly curved trajectories.
The Dangerous Space
The dangerous space (called the “margin” in British sources)
is the area from “first catch” to “first graze” at any particular sight
setting. First catch is the range at
which a bullet fired at a given sight setting will hit a standing man at the
top of his head, and first graze is the range at which that same bullet would
hit a man on his foot. Thus, the
dangerous space is the range over which a bullet would hit an enemy somewhere
from the top of his head to his foot when aiming at his waist (which is where soldiers were taught to aim) with the back
sight set to the correct range.
At normal rifle ranges the trajectory will pass over an
average soldier’s head for quite some distance (e.g., when shooting the Pattern
1853 Enfield the apex of the trajectory when shooting at 600 yards was more
than 25 feet from the ground), so knowing the dangerous space is quite
important. With black powder rifles
dangerous spaces start very wide, but at longer ranges the space shrinks
dramatically because of the parabolic nature of the bullet trajectories. As this demonstrates, the ability to estimate
range is critical for achieving hits at longer ranges.
With the Enfield musket’s back sight set for 600 yards and
the weapon fired at a target 565 yards away the target would be hit in the
head, whereas if the target was at 600 yards he would be hit at the waist (the
point blank), while if the target was at 635 yards he would be hit on the
feet. If the target was closer than 565
yards or if he was farther than 635 yards, he would not be hit at all. Thus, if the back sight on a P-53 Enfield is
set for 600 yards, a target would be hit somewhere from his head to his feet
within a 70-yard space; this is the “dangerous space” for that sight setting
with that weapon. At 300 yards the
dangerous space for the P-53 was 145 yards, but at 600 yards it shrank to a
mere 70 yards, meaning that to have any chance of hitting an enemy at that
range the soldier had to be able to estimate the range to within 70 yards
(Walker 1864 p. 131). This demonstrates
how critical was the need to be able to judge distance accurately.


 |
| After Walker 1864 p. 131. |
Using a Stadiometer
The stadiometer or “stadium rangefinder” is a device used
for estimating distances based upon the principle of similar triangles. This
means that, for a triangle with a given angle, the ratio of opposite side
length to adjacent side length (tangent) is constant. Thus, if you know the
height of an object you can estimate the range to that object because the ratio
of its height to the distance at which it lies (which form the horizontal and
vertical legs of a right triangle) will be a constant.
 |
| After Walker 1864 p. 147. |
Several texts of the period give detailed instructions for
using stadiometers, including Busk, Heth, and Walker, among others. In general,
few individual soldiers probably would have had them (although Heth suggested
giving silver ones as prizes in company shooting contests), so they would more
than likely have belonged primarily to officers.
To use a stadiometer, put the attached string in your mouth (or
at the eye, or on the tip of the nose, depending upon the source) and extend
the device to the fullest extent of the string.
Busk said the string should be 25 inches long (p. 97), but you actually
need to calibrate it by checking a partner at a known distance. Look through the opening to see the target
and hold the unit so that the upper edge of the opening is at the top of the
target’s head, then move the slide (on models that have one) up until it is at
the target’s feet; if the device doesn’t have a slider, you just find where the
target fits in the gap. The approximate distance to the target can then be read
from the scale engraved on the side of the stadiometer.
 |
| An extremely crude representation of a stadiometer. This should not be taken as accurate, nor to scale, and is only intended to show how to use such devices. Look through the opening and move the slider (when available, not all had them) until it just contains the target figure and read the range in yards from the sale. In this case, the range is 100 yards. |
 |
| After Walker 1864 p. 148. |
Note that most original devices had two scales, one for
infantry and one for cavalry. They were calibrated to assume that infantrymen
are six feet in height while mounted cavalrymen are eight feet. Naturally, in
real life the target may be taller or shorter than exactly this height, so
this is only an approximation.
This example was taken from Busk (p. 97) and represents a
fairly crude device which simply has a triangle cut into the plate with a scale
engraved on it.
 |
| After Busk 1860 p. 97. |
The next device is also pictured in Busk and shows a more
sophisticated device with a slider for getting a more precise estimate. It was manufactured by Holtzappfel & Co.
in London and was also sold to the Frankford Arsenal in the U. S. for use in
our Civil War (Huggett 2023 p. 163).
 |
| Drawing after Busk 1860 p. 97. |
 |
| Photograph courtesy Jon Huggett; used by permission. |
This next unit was manufactured by Geo. W. Simmons & Bro.
of Philadelphia, PA. and is very similar to the drawing below it from Heth.
 |
| After Heth 1862 pl. 7. |
The final device was made by Chadburn & Co., an optical maker
in Liverpool, England and was patented in 1860.
It is different in having cut outs for each range and not having a
slider. Note that it has two holes; a right-handed person would put the string into the hole on the right, and vice-versa.
 |
| After Huggett 2023 p. 162; used by permission of the author. |
Modern Reproductions
Stadiometers were ingenious
tools, and we are very fortunate to have several good reproductions available
today that shooters can experiment with in order to get a better feel for
historical shooting. There are three
modern reproductions of which I am aware, although period texts showed more
designs than this.
My Holztapffel-style stadiometer (see below) is a crude copy
of the style shown in Busk and others sold by Cash Manufacturing (q.v.), but this
one does not include a scale for cavalry.
The next reproduction is a
copy of the style used during the Civil War as pictured by Heth and was
purchased from Capandball.com (q.v.). The
chain and toggle was intended for attaching to the user’s button hole for
carrying.
Finally, my Chadburn-style
stadiometer is a faithful copy of the original shown above and was manufactured
by Jon Huggett (q.v.).
Works Cited
Busk, Hans.
Hand-Book for Hythe: Comprising a Familiar
Explanation of the Laws of Projectiles, and an Introduction to the System of
Musketry, now Adopted by all Military Powers. London: Routledge, Warne, and
Routledge, 1860.
Congdon, James A. Congdon’s Cavalry Compendium. Philadelphia:
J. B. Lippincott and Co., 1864.
Heth, Henry. A System of Target Practice for the Use of
Troops When Armed with the Musket, Rifle-Musket, Rifle, or Carbine. New
York: D. Van Norstrand, 1862.
Huggett, Jon. Knowing
The Enfield – Pattern 1853 to 1865. Volume 1. United Kingdom, Privately Published, 2023.
Walker, Arthur. The Rifle; its Theory and Practice.
Westminster: J. B. Nichols and Sons, 1864.
Sources
Ted Cash Mfg.: www.tdcmfg.com/product-page/range-finder
Capandball.com: www.etsy.com/listing/815854052/us-arsenal-stadia-19th-century-range
John Huggett stadiometer: www.curiouscasper.co.uk/product/chadburns-rifle-distance-gauge/