I recently acquired a Pietta reproduction of the Remington New Model Army (not 1858, please!!) with a 5.5 inch barrel. Unusually for me, this purchase had no basis in historical shooting, the Remington NMA never having been issued with shortened barrels to the best of my knowledge (although local craftsmen may have reworked some). In this case, my intent was to step away from historical shooting for a brief moment to address the question of black-powder firearms for modern self defense.
First, the big question: Should you use a black-powder revolver for self defense today? The answer is not just no, but HELL NO! Don’t do it, it’s stupid… unless, of course, you have no other choice. However, in these sad days when many states have chosen to utterly reject the Bill of Rights and the recent Supreme Court rulings because they are ruled by tyrannical, criminal politicians and populated by mincing, sad, weak, cowardly slave voters there are places where a black powder weapon is a man’s only choice.
For those poor unfortunates, just saying “don’t do it!” is not helpful; instead, we have to ask how they can best do it. There are really two issues facing those who choose to use black powder revolvers: Handling and effectiveness. With regards to handling, a full-sized cap and ball revolver with a 7.5-inch barrel is not very convenient, even just for having around the house, so a smaller revolver is better as long as the effectiveness is still sufficient. A 2- to 3-inch barrel will dramatically reduce both accuracy and terminal ballistics, so I chose to concentrate on a 5.5-inch barrel, and later in this essay we will determine whether that is sufficient for an effective revolver.
A .36-caliber revolver is smaller and easier to handle than a .44-caliber, but in period the British complained that the .36-caliber Colt Navy’s they carried in the Crimea were insufficient, which led to their abandonment in favor of the .44 Adams (although many Civil War soldiers liked the .36 just fine), and here, too, we will consider the .44-caliber revolver as the better choice.
We also have to consider whether to use modern metallic cartridges or historical paper ones or even loose powder and ball. While paper cartridge or loose powder and ball can work, they are clumsier and less effective than metallic cartridges, so we want to be able to use the latter.
The best choice, then, would be an antique revolver, preferably double action, such as a Merwin Hulbert or Smith and Wesson, since they don’t count as firearms in most states. Unfortunately, such weapons are expensive and hard to find, and some may be quite worn out. We can, however, buy modern, new-made cap and ball revolvers through the mail in most states and then convert them to fire metallic cartridges.
There are two ways of converting a cap and ball revolver to metallic cartridges: the Kirst system and the Howell system. Although the Kirst system can work very well, they require pretty advanced gunsmithing skills to install (especially since the quality these days has fallen off and they require a lot of highly skilled fitting) and are more expensive than the Howells. Howell makes conversion cylinders for both Colts and Remingtons, but to reload Colts you have to basically disassemble the revolver, whereas with the Remingtons you simply remove the cylinder, making the Remingtons a better choice.
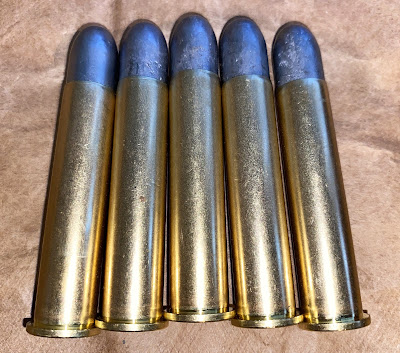
Therefore, taking all of that into consideration, for this effort I chose to acquire a Remington .44-caliber New Model Army revolver with a 5.5-inch barrel from Pietta; I chose Pietta because in my experience they are more functional and better shooters than Ubertis despite not have quite as nice fit and finish, but honestly, either will work. I also chose to acquire a .45 Colt (not “Long Colt,” please!!) Howell conversion cylinder for it.
I have a mold that makes a 255-grain replica of the bullets made by the Frankford Arsenal in period because, after all, I
am a historical shooter, but any good, heavy bullet will do. I experimented with numerous charges, including modern smokeless powder. But while the cylinders are proofed for modern powder, the revolvers themselves are not, and all the recommendations are for using light loads which are not well suited to self defense, so I chose to use black powder instead. It is possible to load as much as 40 grains of powder; the first civilian .45 Colt cartridges had that much, and I know folks who do so today, but the first U.S. Army cartridges had only 30 grains and later they dropped to 28 because the recoil of the heavier cartridges made them more difficult to use in real combat, and my experiences with heavier charges confirmed that, so I have chosen to use 30 grains of Swiss 3F powder.
So now we have my choice for a black-powder revolver for modern self defense: A Remington New Model Army with a 5.5-inch barrel and a Howell conversion cylinder shooting .45 Colt metallic cartridges using 255-grain lead bullets over 30 grains of Swiss 3F powder. Is that good enough? That’s what I sought to discover today.
The two primary factors in effectiveness are accuracy and terminal ballistics (“stopping power” is a meaningless, misleading term used by amateurs). Accuracy is somewhat subjective, but I hold that if you can reliably shoot a String Test with an average of about 3 inches/round at 15 yards, that is sufficiently accurate—it is enough to hit a head or a heart at that range. Studies have shown that a muzzle energy of about 200 foot-pounds is necessary for a good self-defense cartridge, so that will be our basis here: We want a String Test of around 3 inches or less and more than 200 foot pounds of muzzle energy. Note that the modern .45 ACP with a 230-grain FMJ bullet fired from an M1911A1 pistol has a Muzzle Energy of about 360 foot-pounds (although you can get hotter rounds) for comparison.
To understand the String Test and why you should be using it to gauge your accuracy, see my article here: historicalshooting.blogspot.com/2020/12/the-string-test-measure-for-historical.html
The calculator I used to determine muzzle energy can be found here: ballistics101.com/muzzle_energy_calc.php
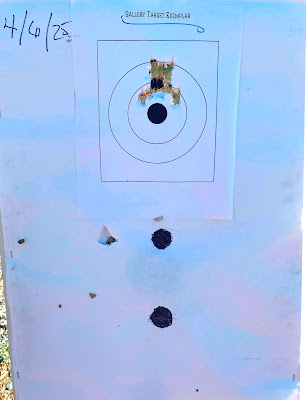
Today I shot 4 tables of fire for this test, 2 with my full-sized Remington New Model Army, and 2 with my 5.5-inch NMA, using the exact same cartridges in both. All shots were made from a seated supported position using a Full Sight with a 6:00 hold on the 3-inch disk on the target. I swabbed the bore and wiped down the base pin between each table of fire. Here are the results:
 |
| Table One. |
Table One: Full-Sized Remington NMA
String: 8.5 in.
Rounds: 5
String Test: 1.7 in./rd.
Average MV: 905.6 fps.
Spread: 26 fps.
 |
| Table Two. |
Table Two: Full-Sized Remington NMA
String: 11.5 in.
Rounds: 5
String Test: 2.3 in./rd.
Average MV: 906.8 fps.
Spread: 39 fps.
 |
| Table Three. |
Table Three: 5.5 in. Remington NMA
String: 15.0 in.
Rounds: 5
String Test: 3.0 in./rd.
Average MV: 818.4 fps.
Spread: 27 fps.
 |
| Table Four. |
Table Four: 5.5 in. Remington NMA
String: 22.0 in.
Rounds: 5
String Test: 4.4 in./rd.
Average MV: 836.0 fps.
Spread: 23 fps.
Conclusion
It should be obvious from these results that the full-sized Remington is absolutely adequate for self defense. Averaging the String Tests, we get an average of 2.0 inches per round, well below our threshold. Averaging the muzzle velocities, we get an average of 906.2 fps, and using the calculator linked above, we see that that gives an average of 465 foot-pounds of energy, well above what is needed.
The 5.5-inch barrel, predictably, did not perform as well. The average of the String Tests was 3.2 inches per round, which is slightly larger than the ideal, but only slightly, and that ideal is subjective anyway; I would argue that this is more than good enough. The average muzzle velocity of all ten rounds was 822.2 fps, for an average Muzzle Energy of 383 foot-pounds, less than with the full barrel, but still well above our threshold, and 23 foot-pounds above a modern .45 ACP! From this, I think it is safe to say this revolver with this load is absolutely adequate for modern self defense. Note: I did a lot more shooting today with both revolvers and was able to significantly improve with the short-barreled revolver, getting a String Test of 2.42 in./rd. for one table of fire, even though I was firing offhand and not from a rest, once I had a chance to really focus in on the sighting for the shorter weapon and practice with it a bit.
 |
| Table Ten: 2.42 in./rd. with the 5.5 in. barrel. |
Note that the full-sized Remington has been extensively reworked for accuracy and reliability by Gary Barnes of Cartridge Conversion (cartridgeconversion.com/home-page), including a trigger and action job, which made it more accurate than it was originally, while the short-barreled revolver was fired right out of the box. I plan to have Mr. Barnes do a full workup on the new revolver, including a trigger job, forcing cone adjustment, a new and more visible front sight, and more, which will significantly improve its accuracy.
Disclaimer
I am not a lawyer, and all laws vary by state. Take responsibility for yourself and look up your own laws, or, better yet, talk to a lawyer in your state to know what is and is not legal. Likewise, what is and isn’t suited to self defense is something you have to decide yourself. Don’t take my word for anything (except these results), do your own research as if your life depended upon it—because it does.